You'll get everything you need to hit the ground running, with a clear breakdown of essential features, what they do, and how to make the most of them.
Additionally, you’ll find links to help articles so you can explore further whenever you need.
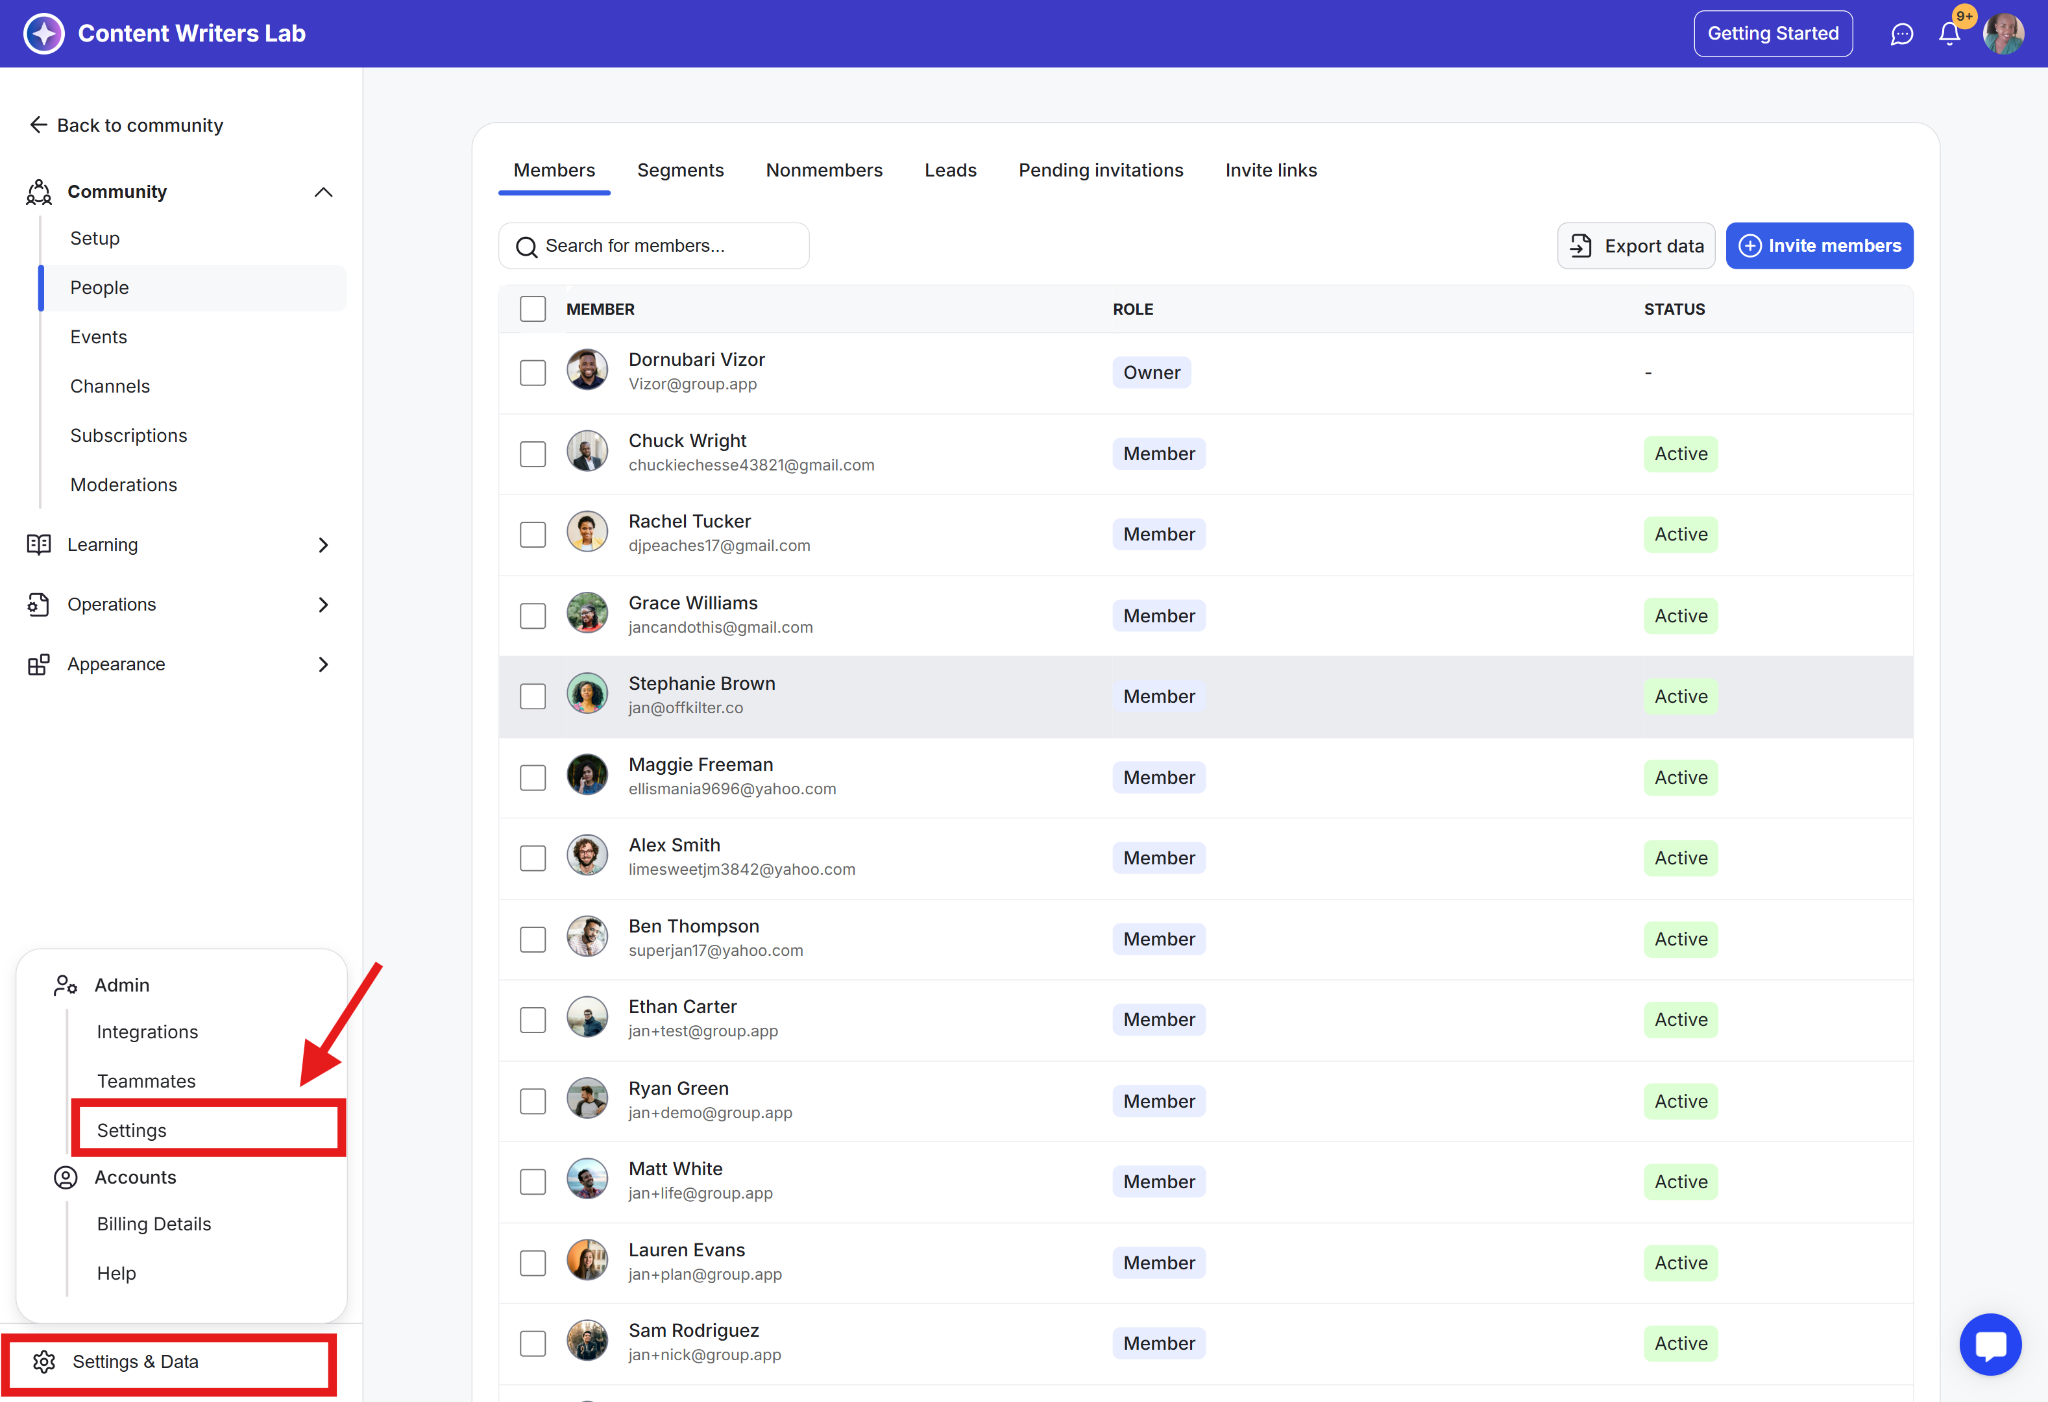
💡After you finish the setup, you’ll be taken straight to your community Admin Panel, and you’ll land on the People Tab.
This is your main control center. All the tools you need are in the menu on the left side. This guide will walk you through the most important parts of the left-side menu in the Admin Panel.
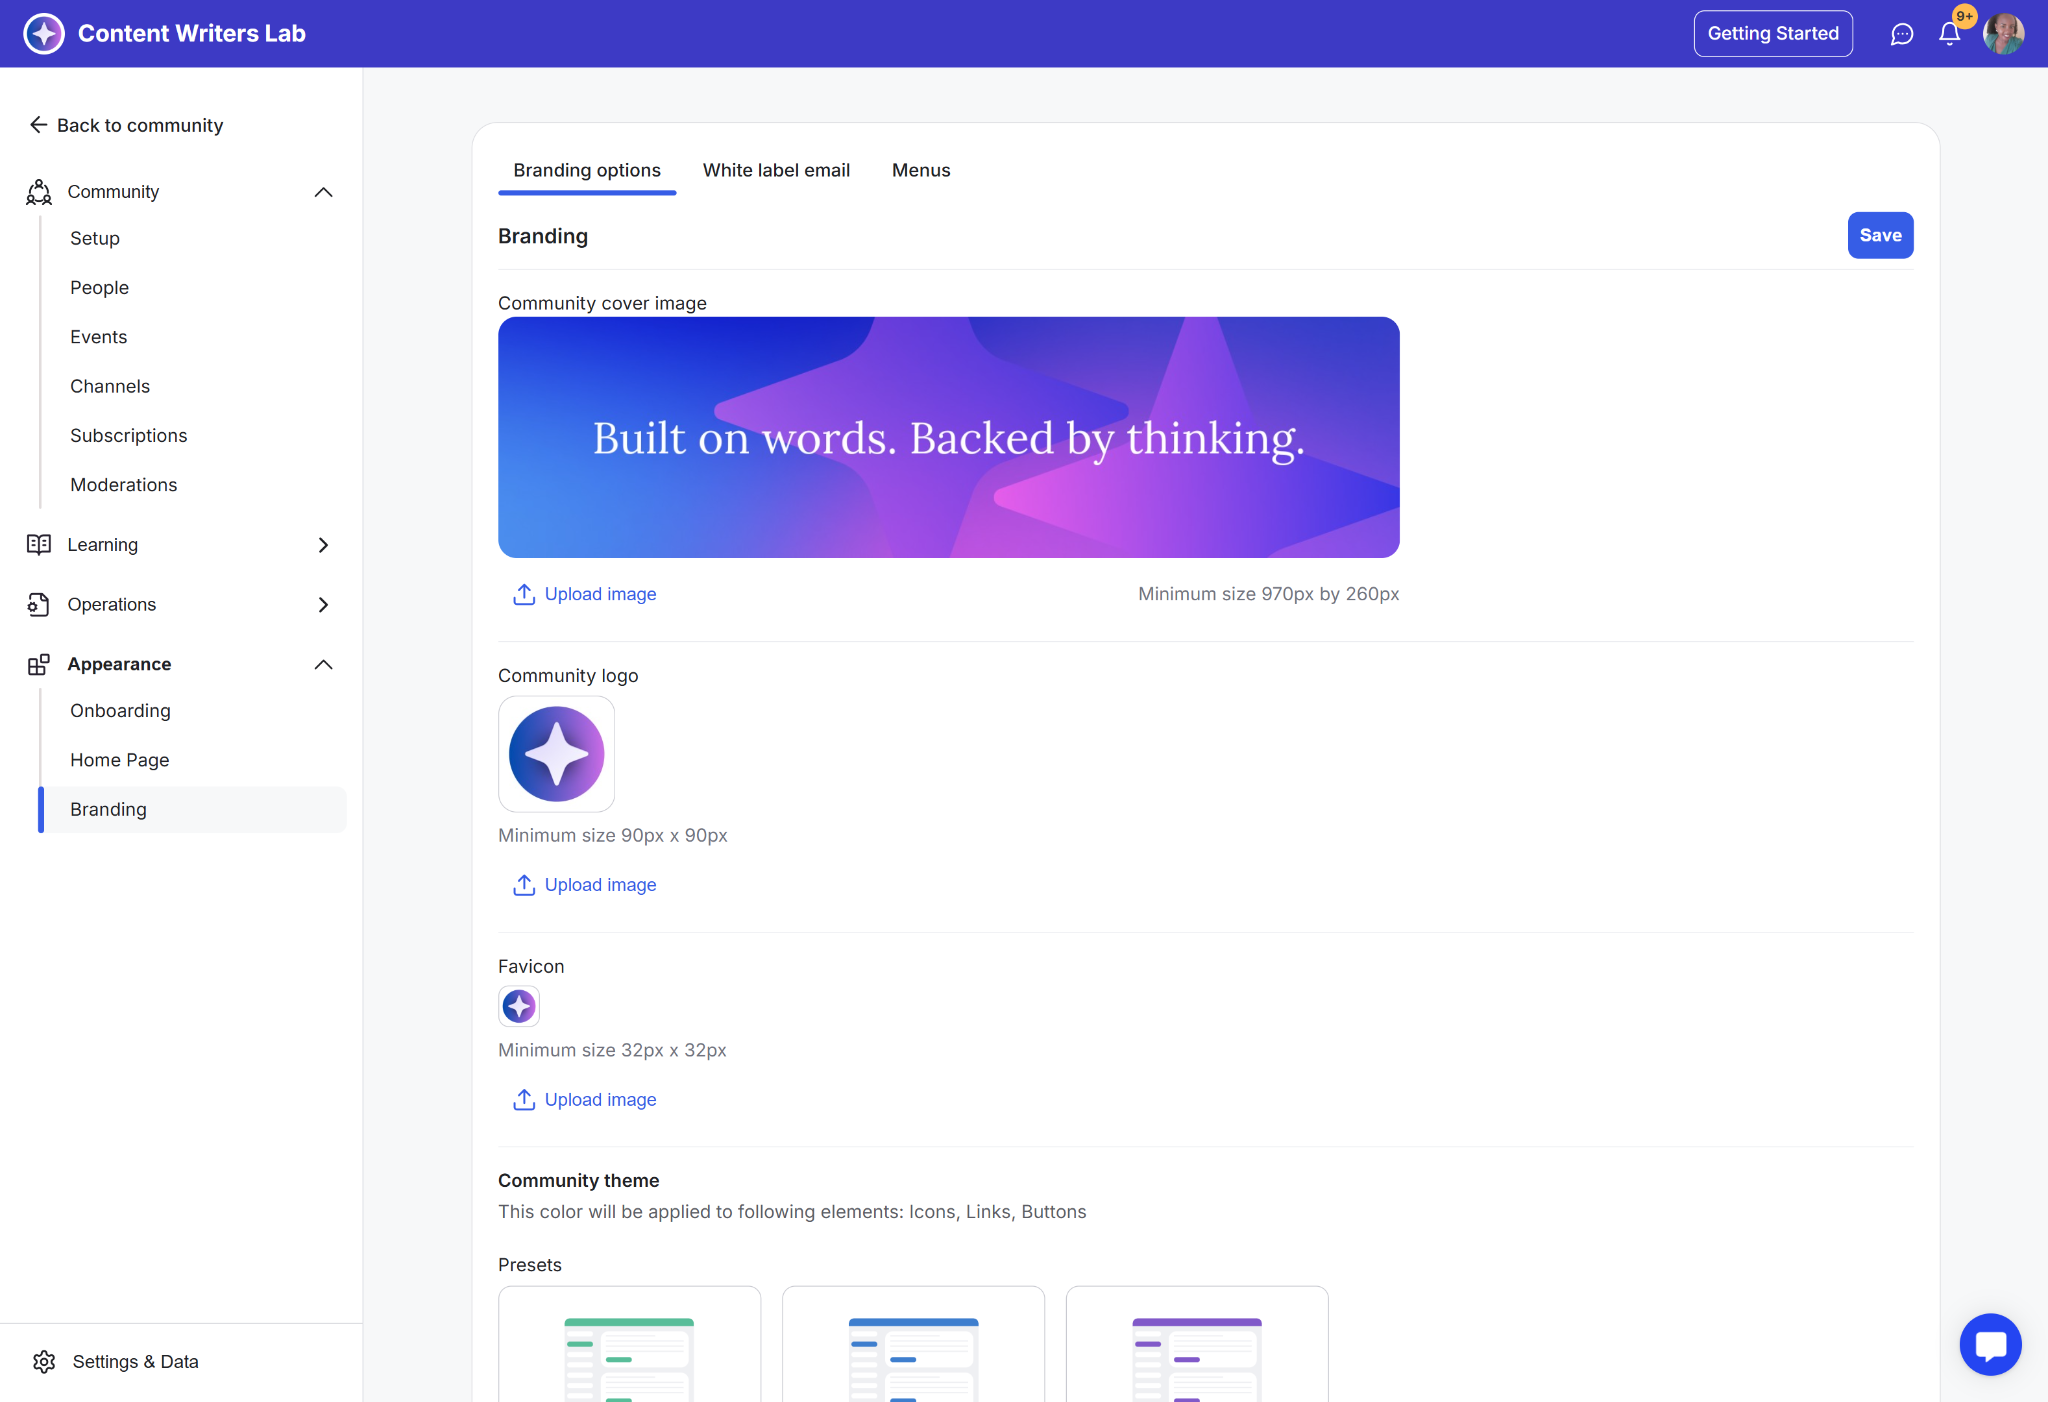
With GroupApp’s Branding features, you can customize your community’s look and feel to match your brand’s identity. A strong, cohesive brand builds trust and makes your space feel polished and professional.
Here’s what you can do:
Upload Your Community Image & Logo: Make a strong first impression with visuals that represent your brand.
Set a Favicon: Customize the browser tab icon for a polished, branded experience.
Choose Your Colors: Match your community’s look with custom brand colors or pick from ready-made themes.
Email White Labeling: Use your business email for all community emails, reinforcing trust and professionalism.
Your community should feel like your space, and GroupApp makes it easy to make it your own.
Go to the Admin Panel.
In the left-side menu, click on Appearance and select Branding.
On the Branding Options tab, configure options, and upload your community cover, logo, and favicon.
Add your brand colors.
Click on Save.
Your profile is more than a bio. It is the first impression you make as a leader. GroupApp helps you create a strong presence, so members quickly understand who you are and what your community is about.
Here’s what you can do:
Add a profile picture: Let people put a face to your name.
Write a strong headline and bio: Show who you are and what you’re about.
Link your socials, contact details, and location: Make it easy for people to connect.
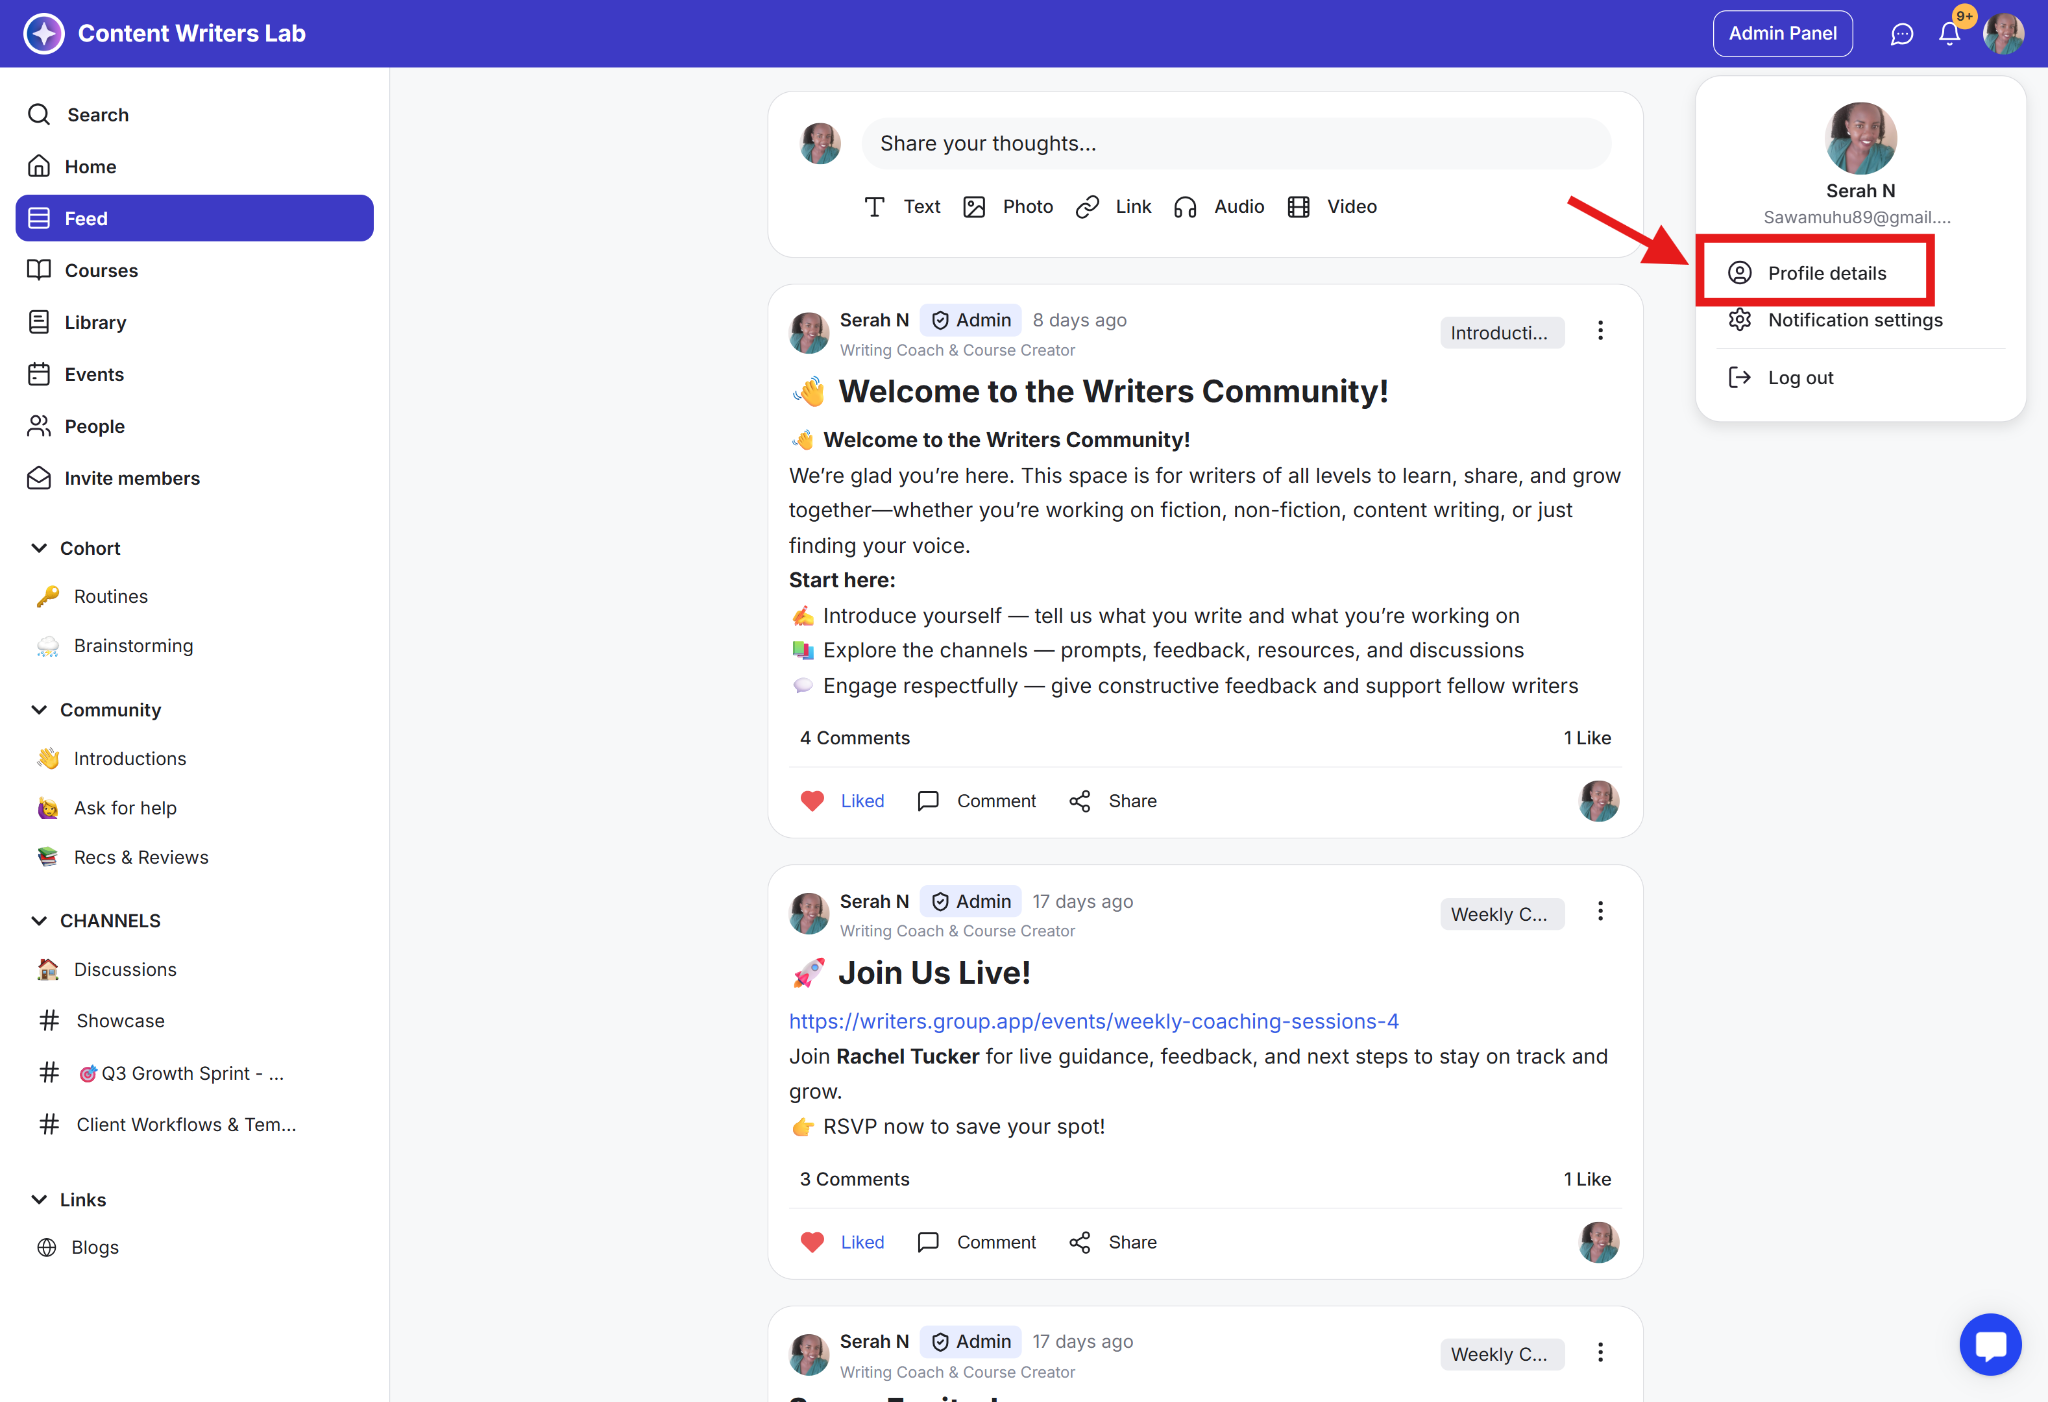
Click on the Profile Icon.
Select Profile Details from the dropdown.
Click on the Edit Icon and edit your details.
Click on Edit Photo to upload your profile image.
Click on Save Changes.
💡A complete profile builds trust and helps you stand out—don’t skip this step.
Your onboarding process sets the tone for new members. GroupApp gives you five key features to create a smooth and welcoming onboarding experience:
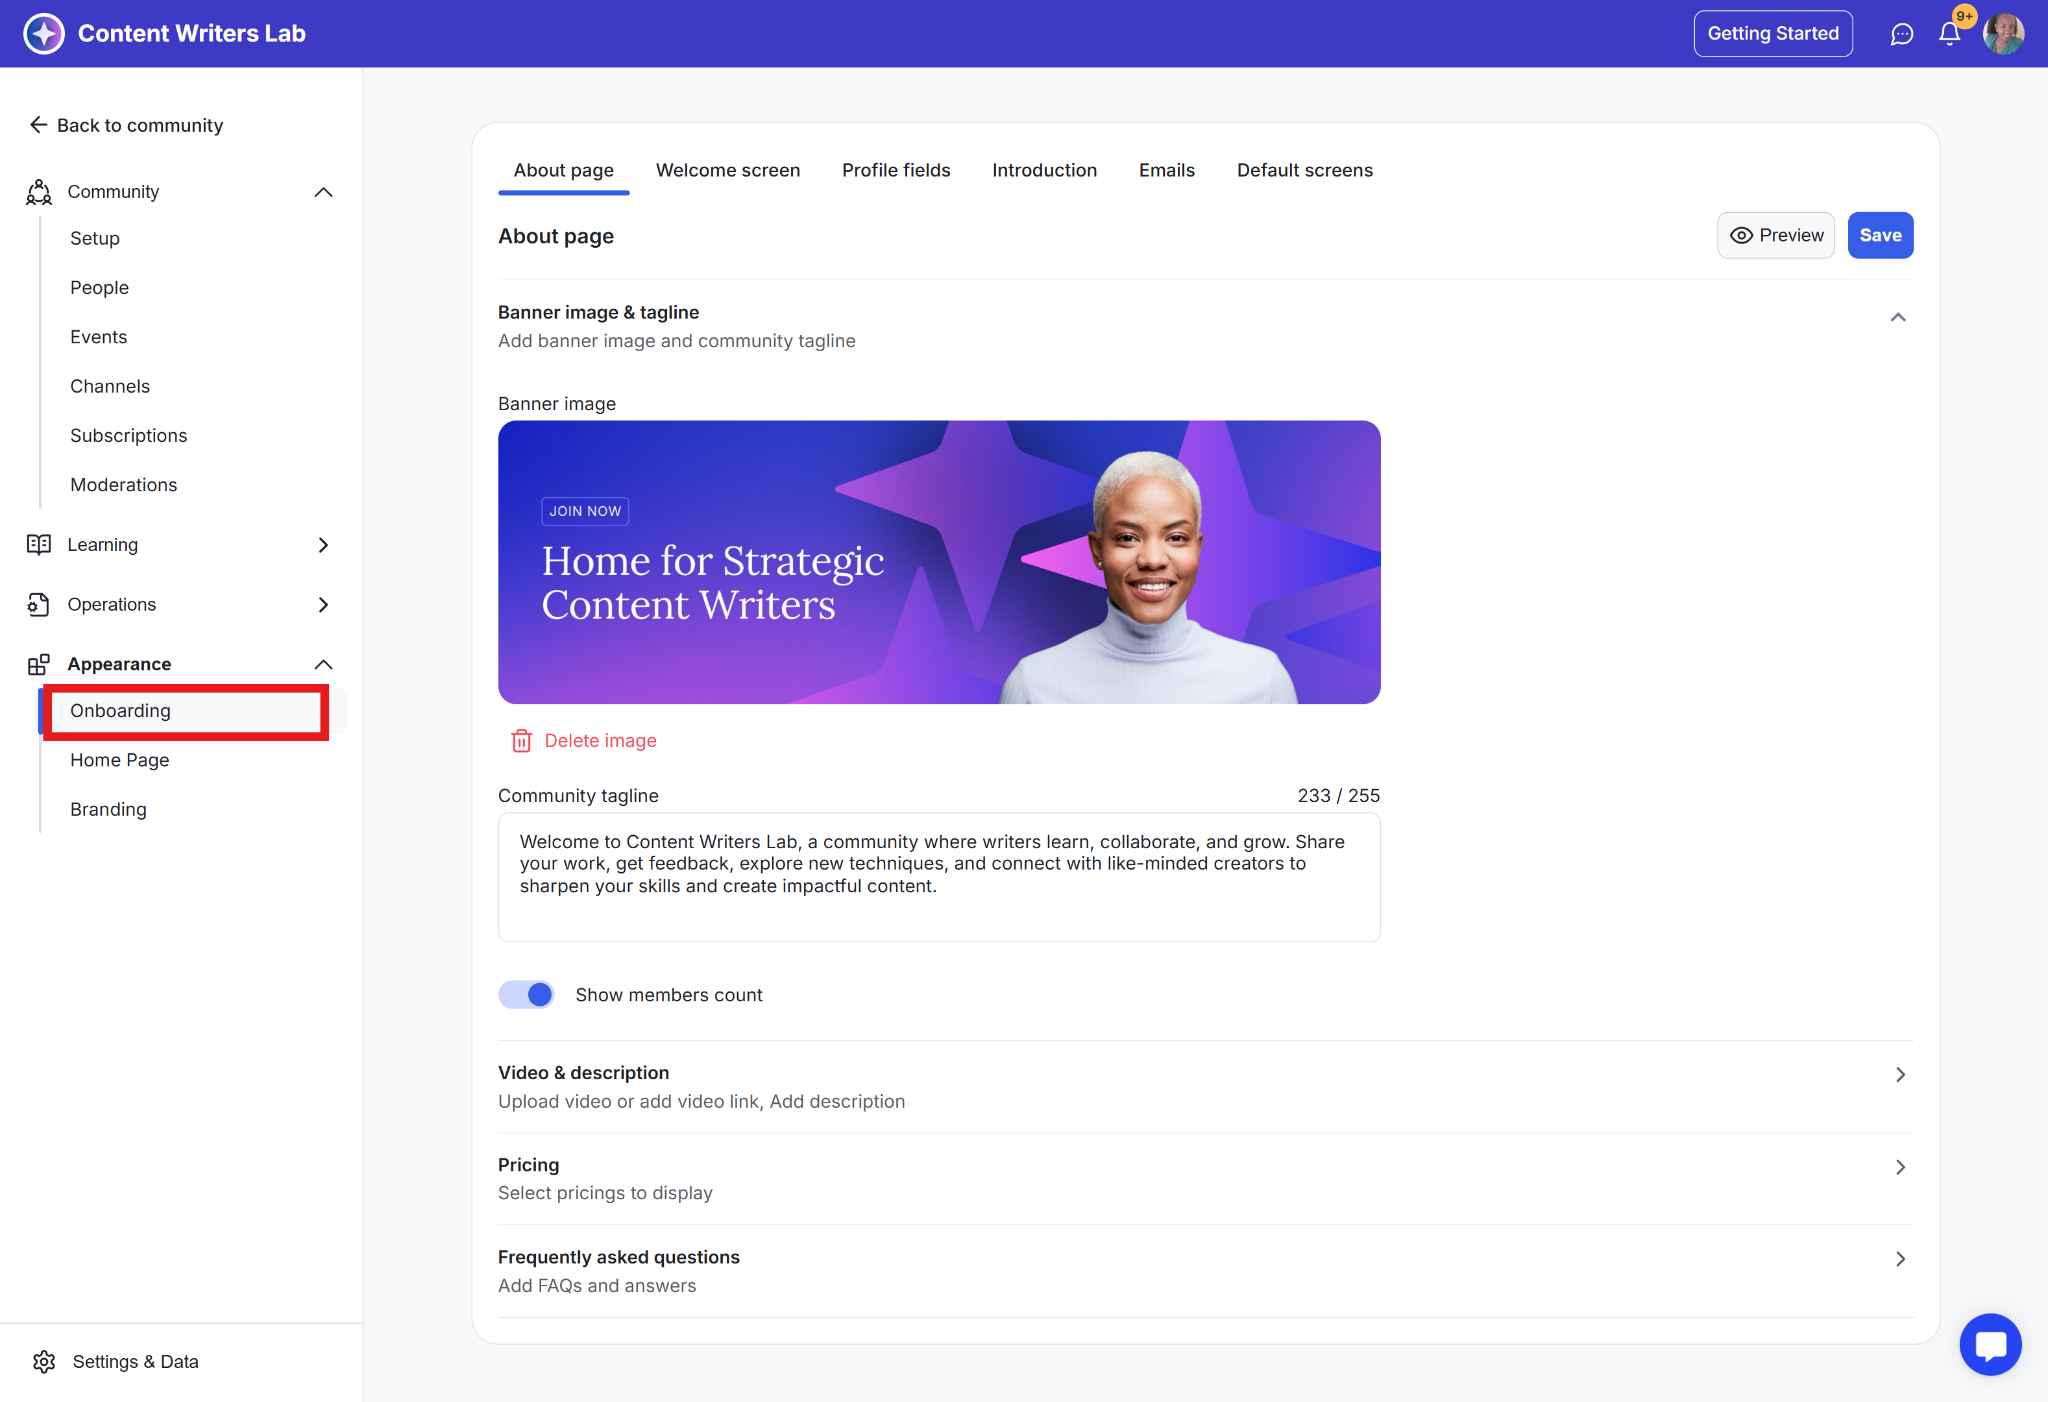
The About Page is the first page people see when they open your invite link, before they join your community. It gives potential members a quick overview of what your community is about.
Showcase your community’s purpose with a title, tagline, and visuals.
Give potential members a clear reason to join before they even sign up.
Highlight membership plans, FAQs, and key details to attract the right members.
A personalized welcome screen helps new members feel at home and provides clear guidance on what to do next.
Greet members with a title, description, and welcome video.
Introduce your community’s culture, values, and key features.
Provide clear next steps to help members get started right away.
Custom profile fields allow you to collect relevant details to personalize the community experience.
Go beyond basic fields to collect valuable member insights.
Encourage deeper connections by showcasing shared interests.
Tailor engagement based on members’ backgrounds and goals.
A dedicated introductions channel helps new members share who they are and start connecting right away.
Provide a welcome message with a template or key questions.
Encourage structured introductions that spark engagement.
Make it easy for members to share and connect from day one.
Customized emails set clear expectations and create a strong first impression.
Personalize welcome and invite emails to reflect your community’s tone.
Provide clear guidance and next steps for new members.
Keep the momentum going and drive early engagement.
💡A strong onboarding experience makes new members feel informed and ready to engage in your community.
Go to the Admin Panel.
Click Appearance on the left-side menu and select Onboarding.
Explore all our help articles on Member Onboarding here.
Think of Channels like TV channels. Each one focuses on a specific topic, making it easy for members to find what interests them without getting lost in unrelated discussions.
Just as you would not expect to find a cooking show on a sports channel, GroupApp Channels let you create dedicated spaces for different conversations, resources, and interactions.
Channels organize spaces for Q&A, course discussions, and exclusive member chats so members can easily find what matters most.
Your community starts with three default channels:
🏠Discussions: For general conversations and sharing insights.
👋Introductions: A space for new members to introduce themselves.
🙋Ask for Help: Where members can seek advice and support.
You have full control over your channels:
Set access levels: Decide who can view and post.
Manage posting permissions: Limit who can create a post in a specific channel.
Moderate posts: Review and approve content if needed.
Pin important posts: Keep key messages visible at the top.
Group channels into Categories: Keep things organized as your community grows.
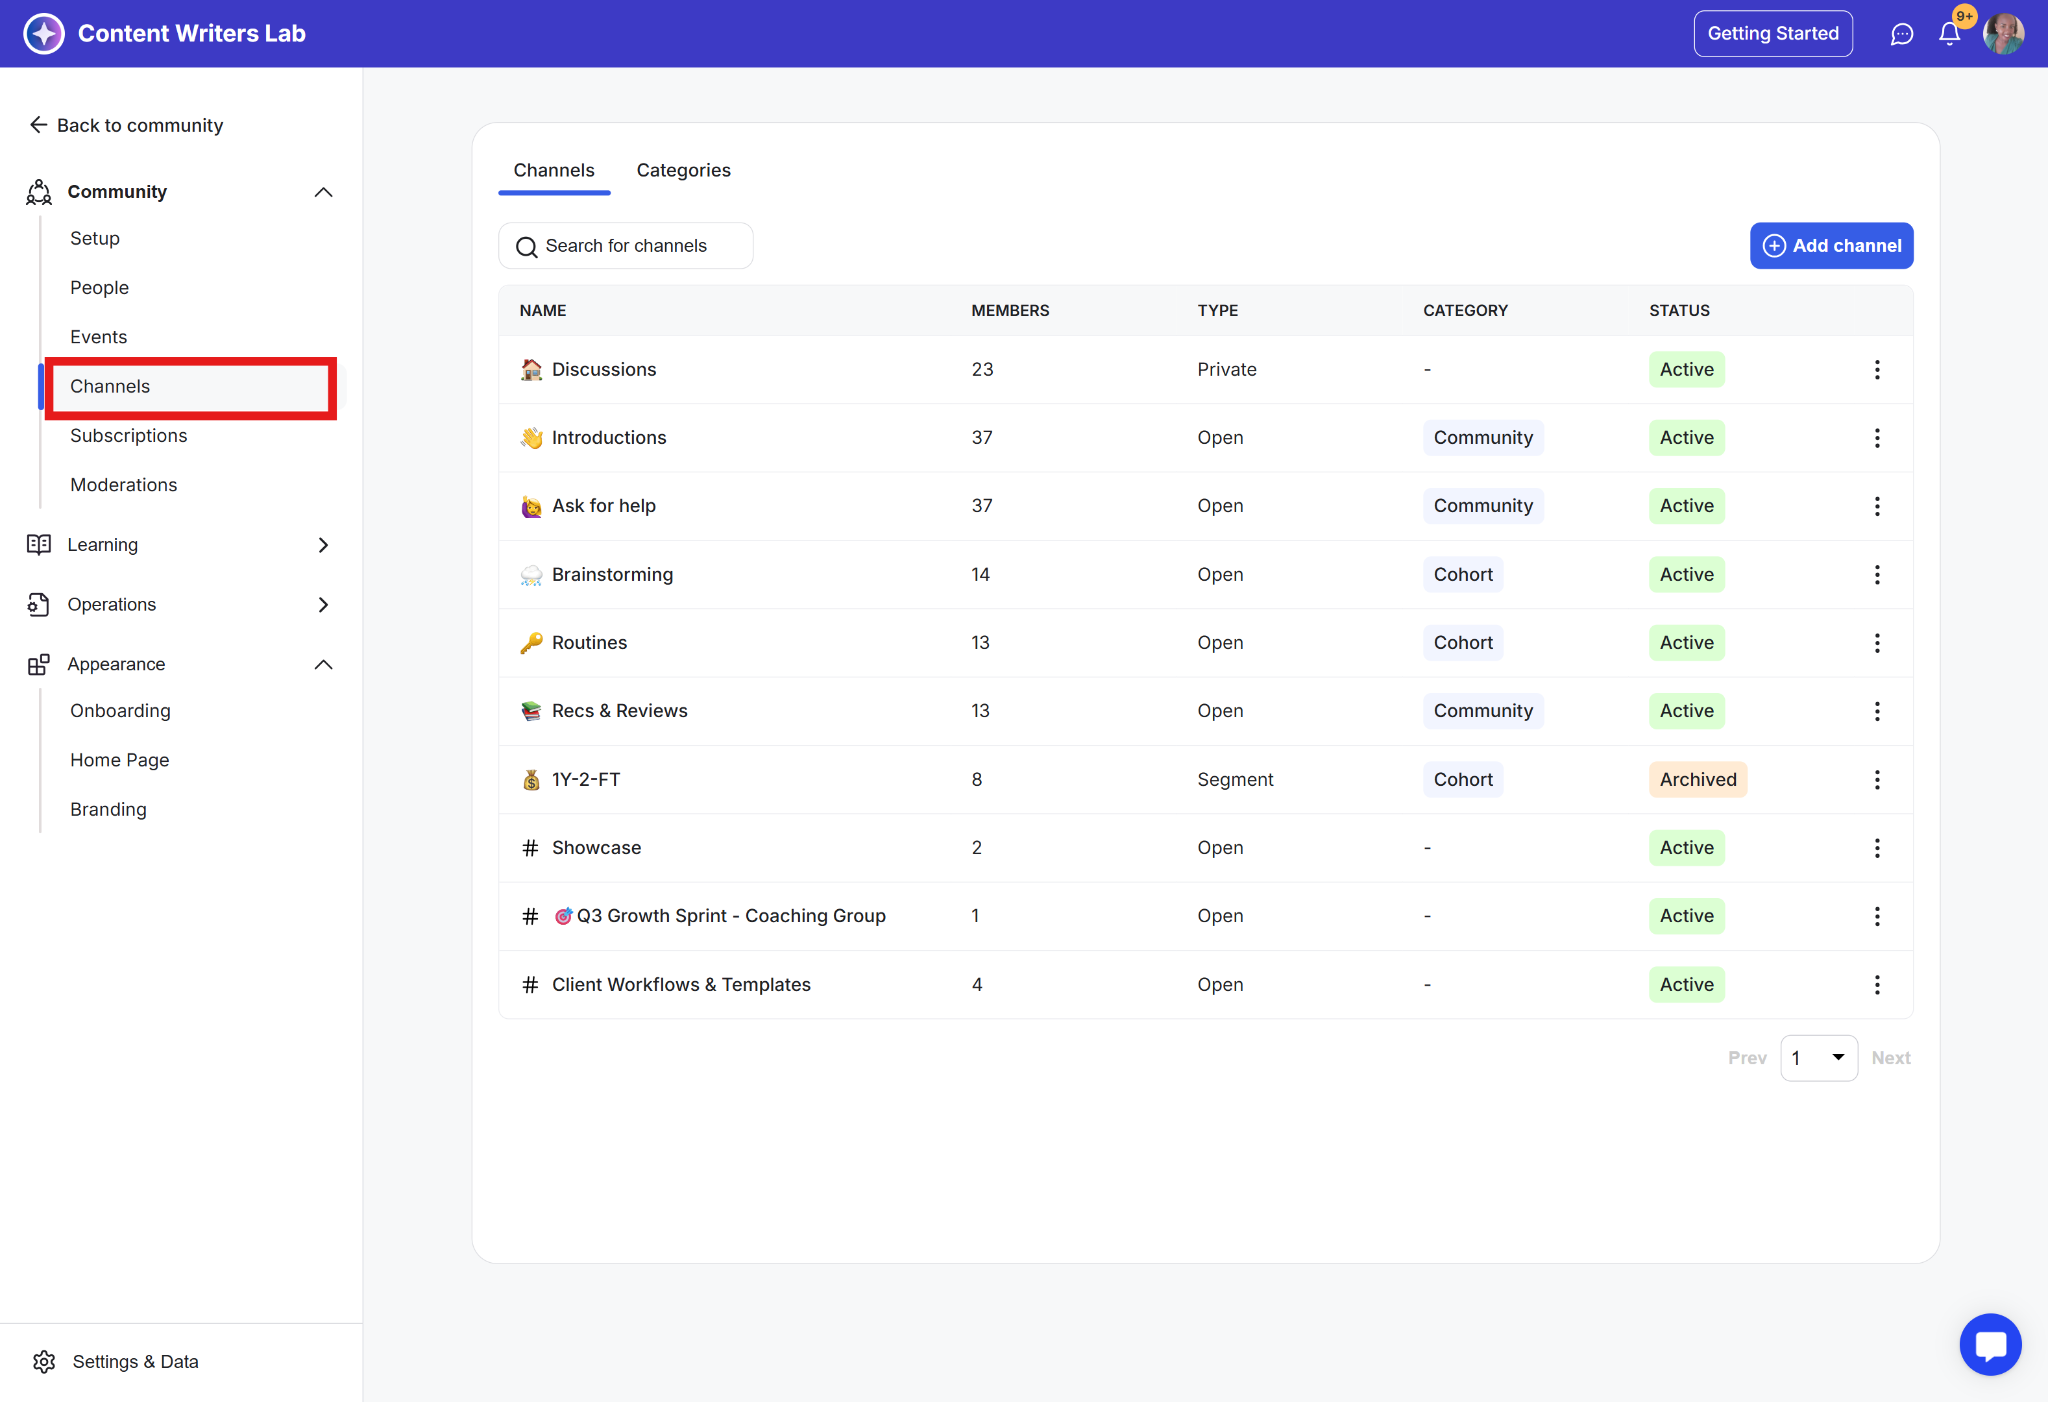
Go to the Admin Panel.
Navigate the left-side menu.
Click on Channels.
Click on the Add Channel button.
Add channel name, description, and cover image.
Set access level, channel layout, and visibility.
Configure all options.
Click on the Save Channel button.
📝Tip: We suggest starting with only the essential channels and adding more gradually as your community grows.
Learn how to configure access for Channels
Your home page is the first thing members see and sets the tone for your community. Make it clear, welcoming, and engaging.
Here’s what you can set up:
Cover Image: Set the visual tone for your community.
Announcements: Share community-wide announcements and make resources easily accessible for members.
Suggested Content: Highlight the most important and latest resources.
Upcoming Events: Keep members informed about what’s coming up.
New Members: Showcase recent members to encourage connections.
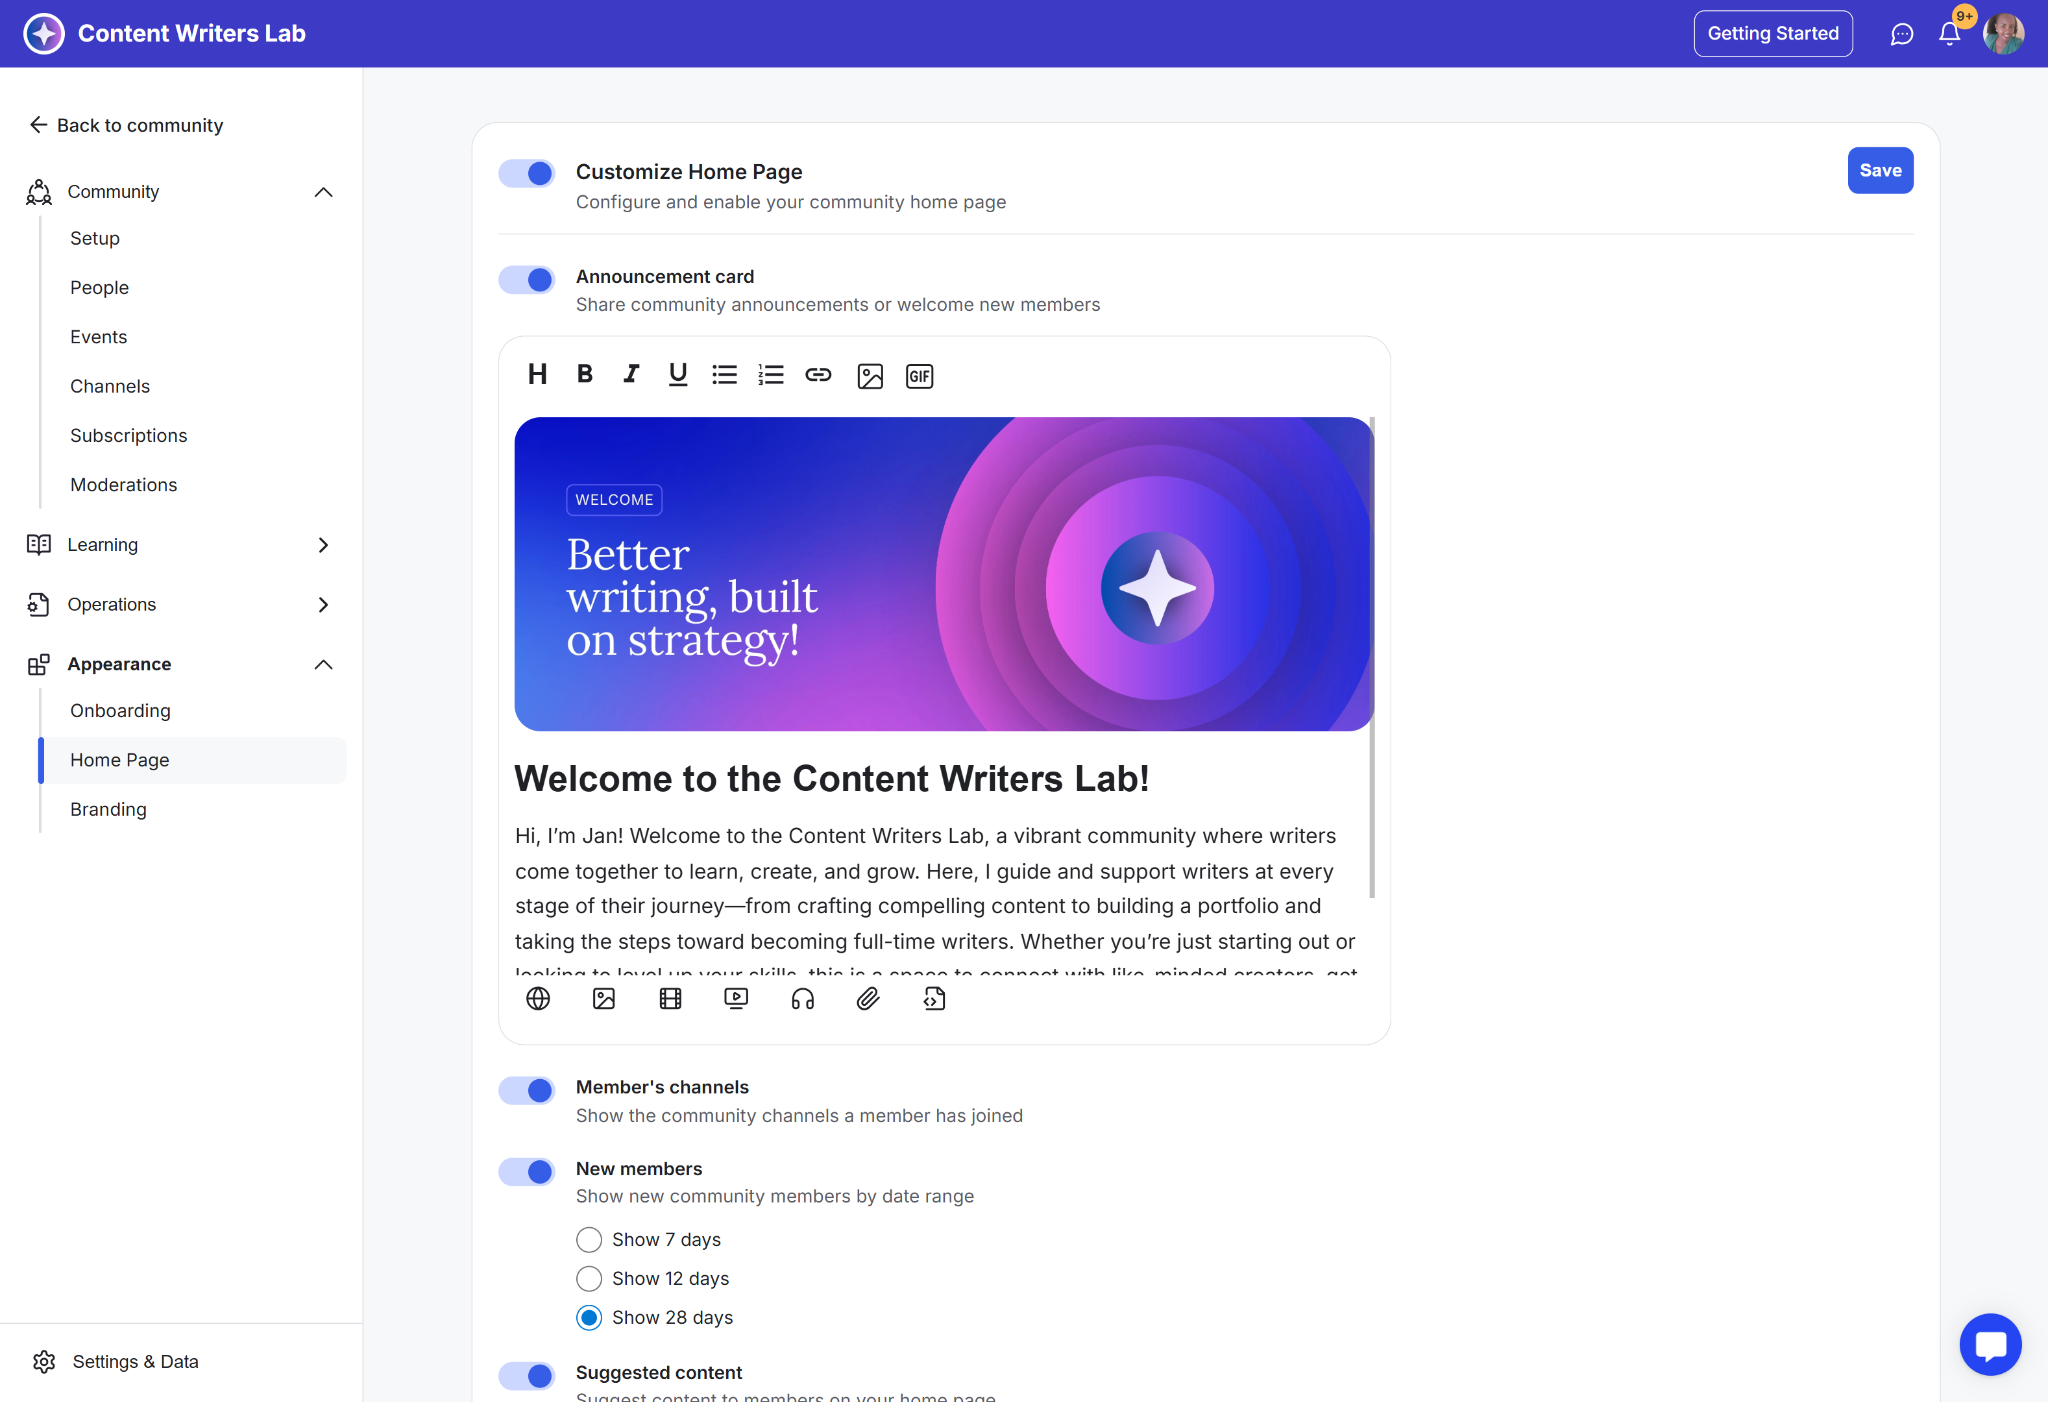
Go to the Admin Panel.
Click on Appearance in the left-side menu and select Home page.
Upload the homepage cover image and add the announcement card.
Configure suggested content, new member mentions, and upcoming events to be displayed on the homepage.
Toggle each to activate or deactivate.
Click the Save button.
Learn more about Community Home Page Configuration.
Keep your learners engaged by hosting and managing events directly within your community.
With built-in event management, you can:
Keep members informed with a clear event calendar.
Ensure attendees never miss a session with RSVPs and reminders.
Make scheduling easy with confirmations and an “Add to Calendar” option.
Extend engagement with post-event discussions and key takeaways.
Set event access as free, paid, one-time, or limited to specific plans and segments.
Run live training sessions and workshops.
Host weekly office hours for member support.
Organize virtual conferences or summits.
Manage registrations for in-person events.
Seamlessly plan, execute, and keep the momentum going!
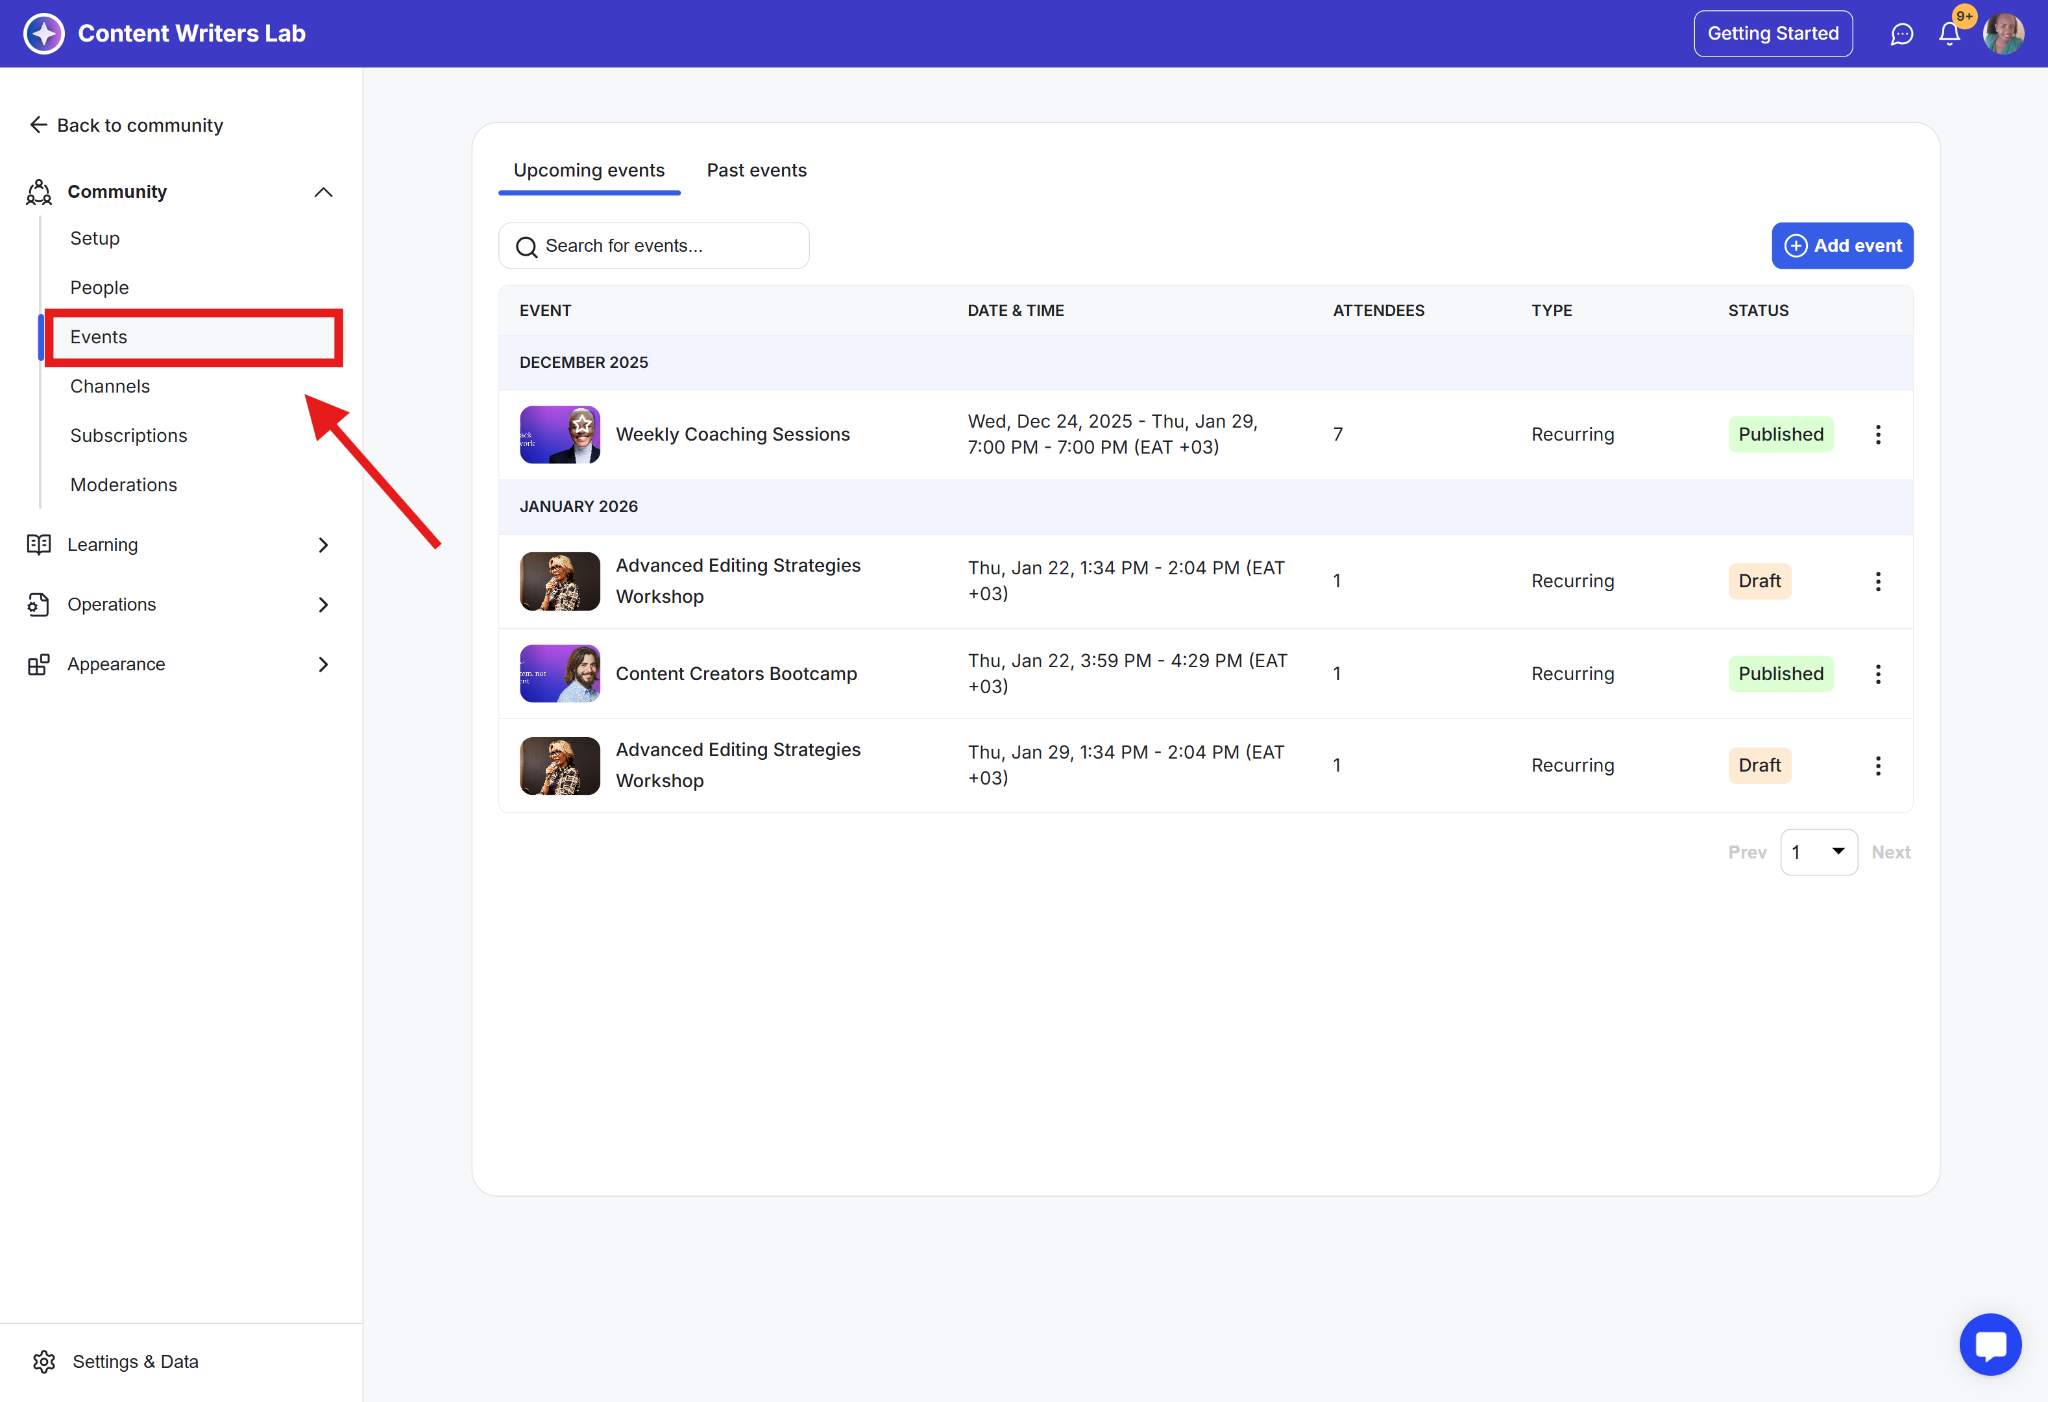
Go to the Admin Panel.
Click on Events in the left-side menu.
Click on the Add Event button.
Enter an event name and type, then click on Next.
Provide the event date and time.
Upload the event cover image and add a description.
Set access level and add reminder emails.
Add a price (if any)
Configure remaining options.
Click Save and Publish.
Find out all our Help Articles on Events here.
Use GroupApp’s course builder to create structured, interactive learning experiences that keep members engaged.
What you can do:
Structured Learning: Organize content into modules and sections for a smooth learning flow.
Multiple Lesson Type: Use videos, web links, text, PDFs, and downloadable resources for a richer learning experience.
Interactive Assignments & Quizzes: Add assignments, enforce submissions, and track learner progress.
Flexible Pricing & Access: Set up multiple pricing tiers and control who gets access.
Expert-Led Content: Add presenters to bring more value to your courses.
Seamless Community Integration: Link courses to discussion channels for deeper engagement.
Resource Sharing: Attach downloadable files to each lesson for extra support.
Community-Based Learning: Create interactive, member-driven courses.
Self-Paced Training: Design engaging courses that learners can complete at their own pace.
Certification Programs: Build structured programs with completion tracking.
Cohort-Based Learning: Run time-bound, group-based learning experiences.
Corporate Training: Manage internal training programs for teams.
Check out our help articles on creating and launching your course.
The Resource Library allows you to keep all your learning materials in one place, organized and easy to share.
Keeps Resources Accessible: Members can find and revisit key materials anytime.
Simplifies Organization: Neatly categorize PDFs, videos, and worksheets for easy discovery.
Enhances Learning: Provide structured content that supports courses and events.
Strengthens Engagement: Offer reference materials to keep discussions and training active.
Generates Revenue: Sell premium resources with controlled access options.
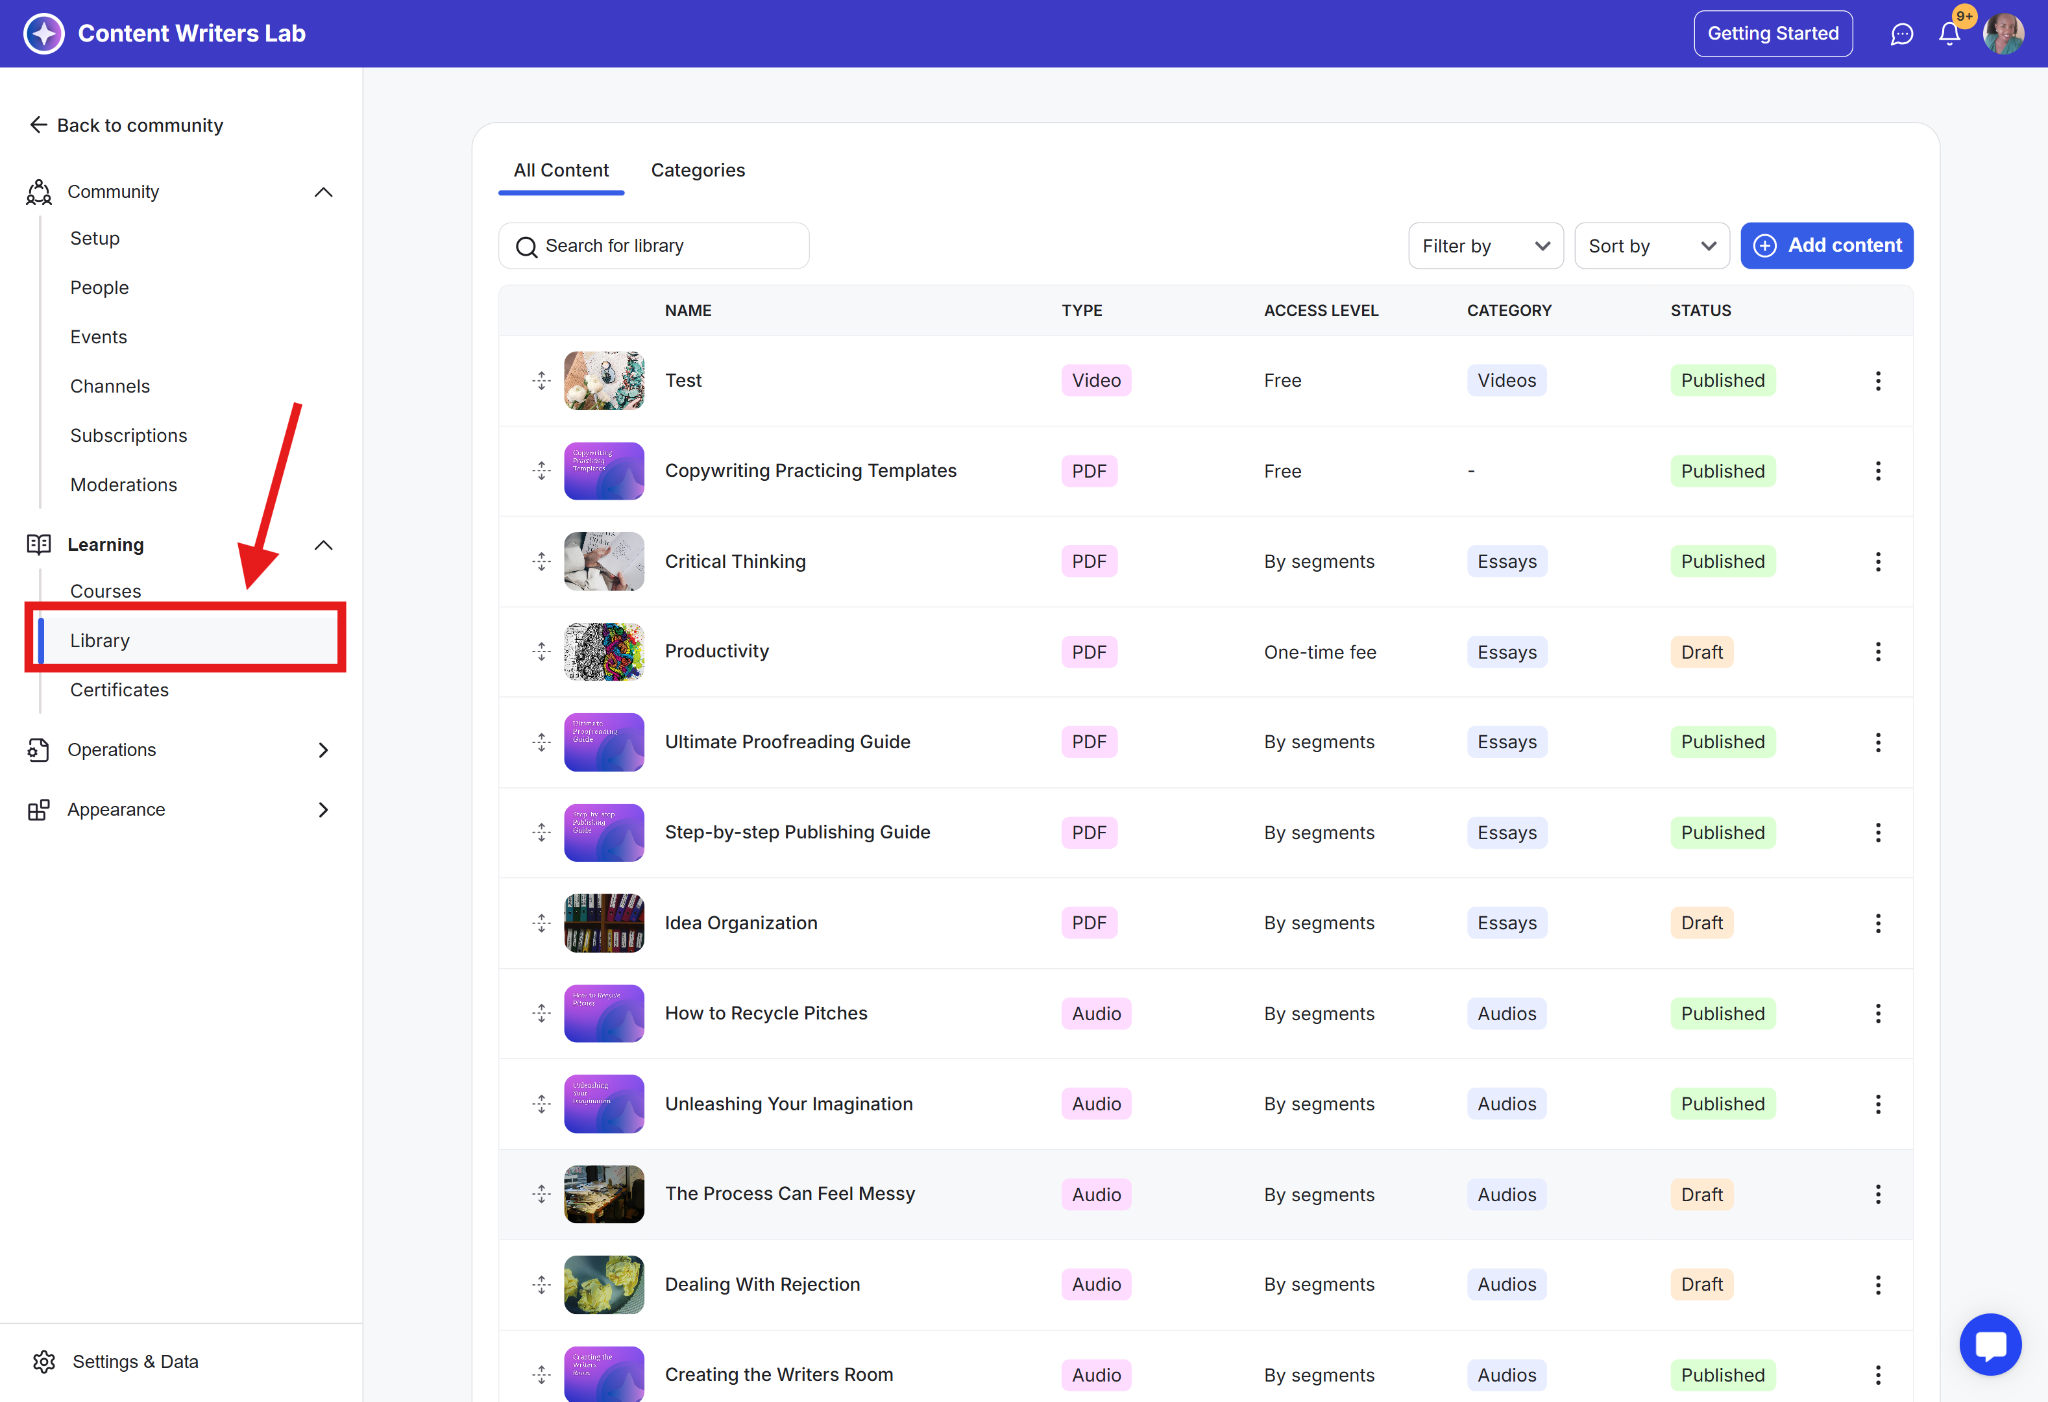
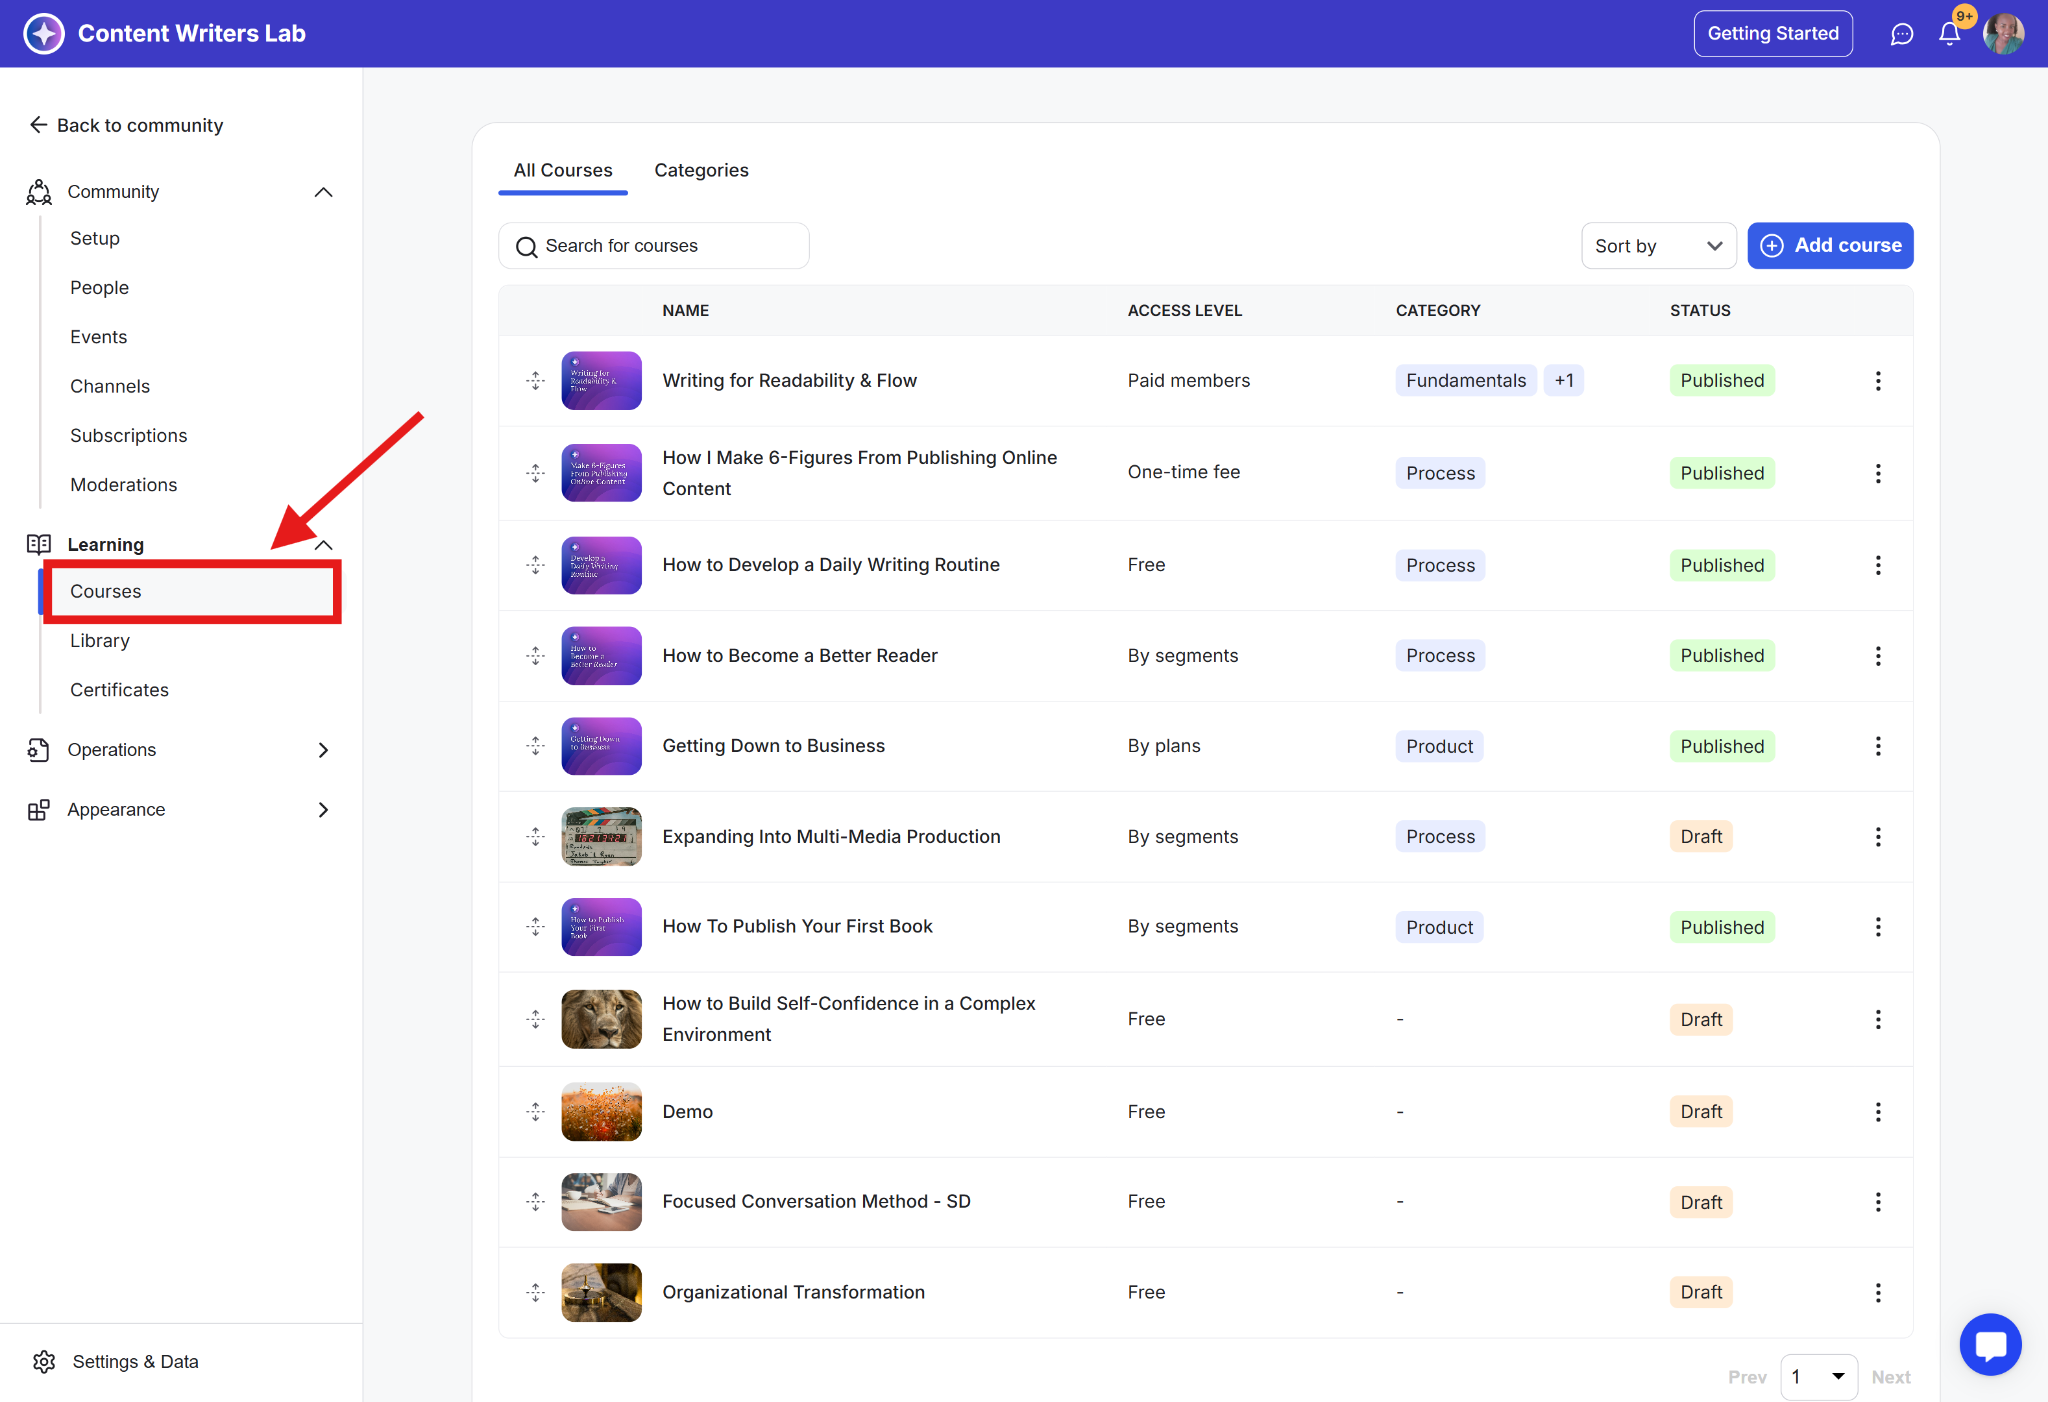
Go to the Admin Panel.
Click on Learning and select Library in the left-side menu.
Click on Add Content.
Enter a name for the resource and select the type.
Upload a thumbnail image and enter a description.
Set access level and visibility.
Click on Save and then Publish.
Check out our help articles on Content Library.
Turn your expertise and community engagement into a sustainable revenue stream. With flexible pricing, you can charge for access to exclusive content, events, and courses.
Create Membership Subscriptions: Offer paid tiers with exclusive perks to build a thriving, high-value community.
Sell Courses, Events & Resources: Monetize your expertise by offering paid access to courses, premium events, and valuable resources.
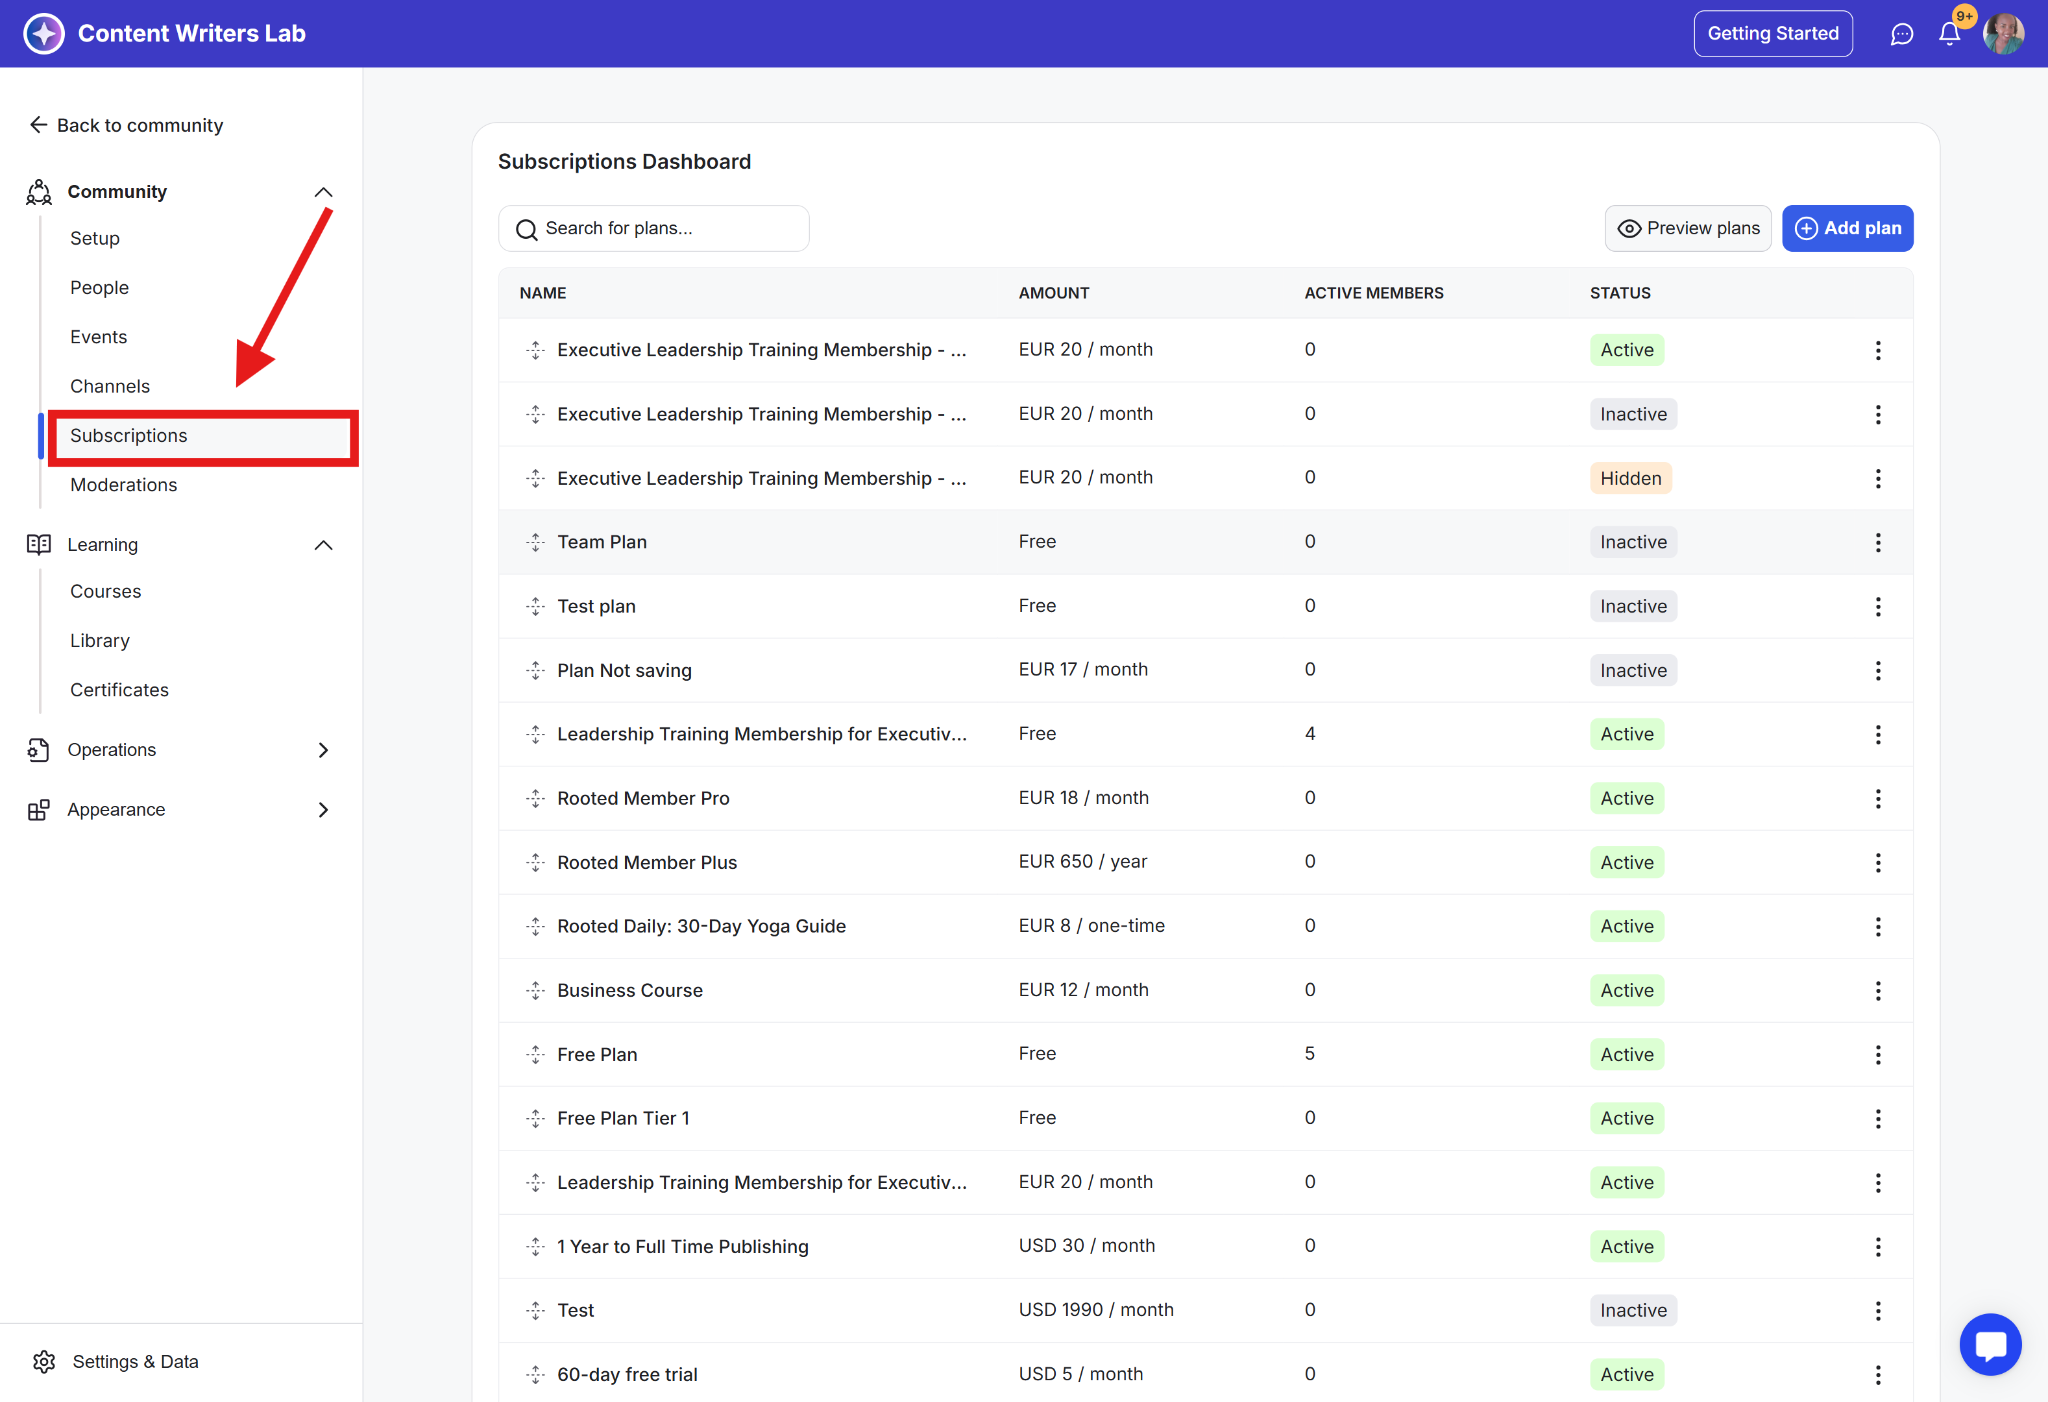
Customize Pricing: Set up one-time payments, subscriptions, or tiered plans to match your audience’s needs.
Attract & Retain Members: Use coupons and special offers to encourage sign-ups and long-term engagement.
Learn more:
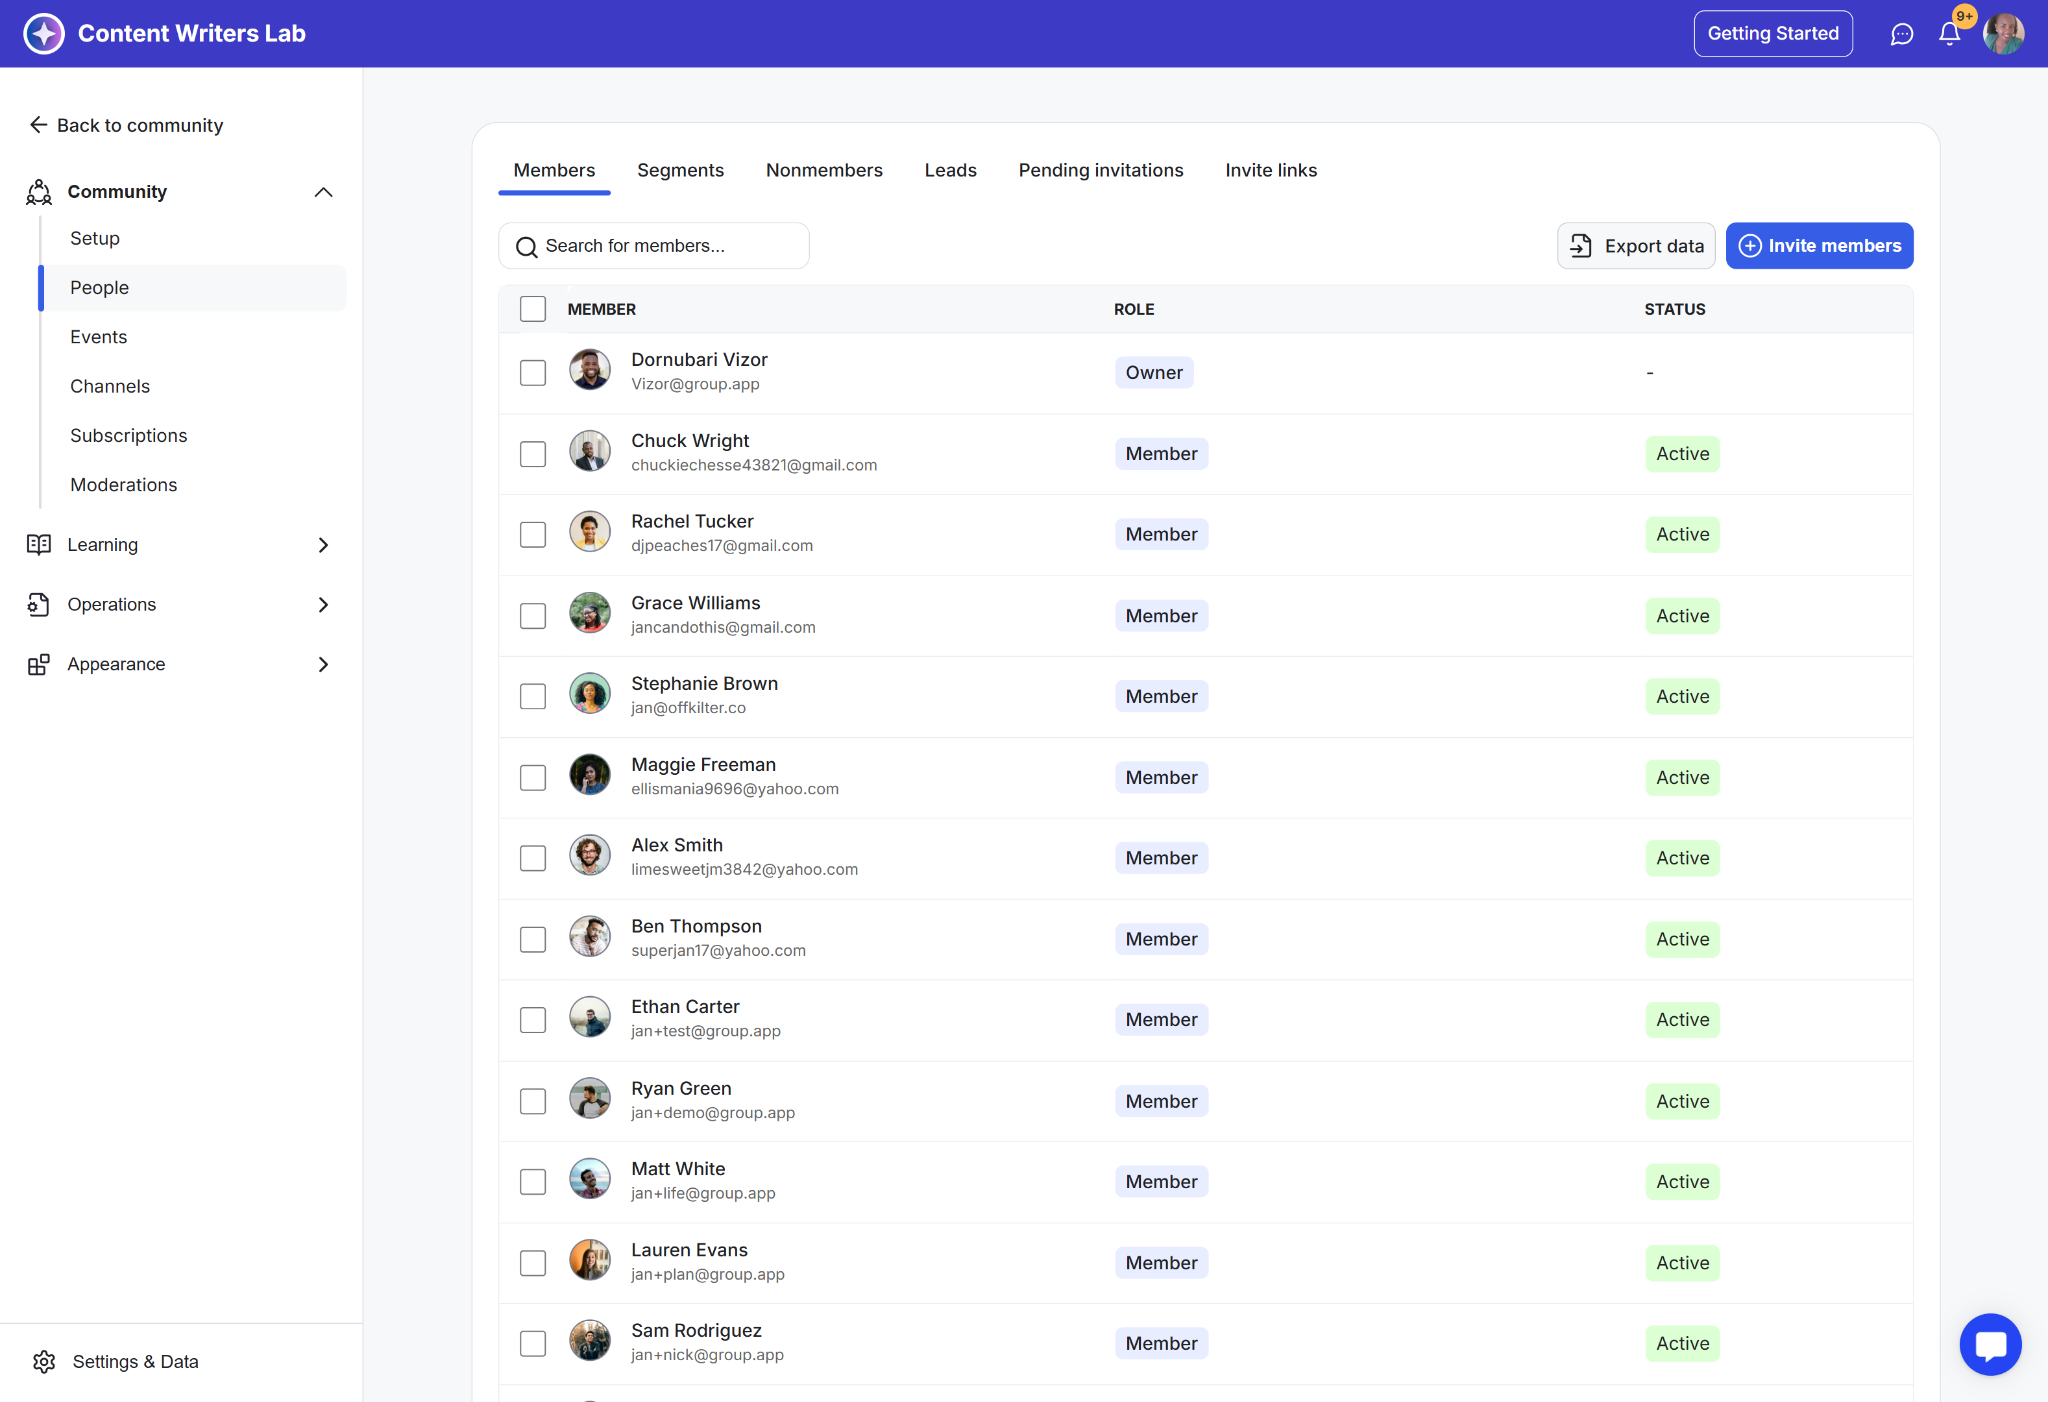
The People section is your central hub for managing everyone connected to your community. From here, you can view members, organize them into segments, and control how people join and access your content.
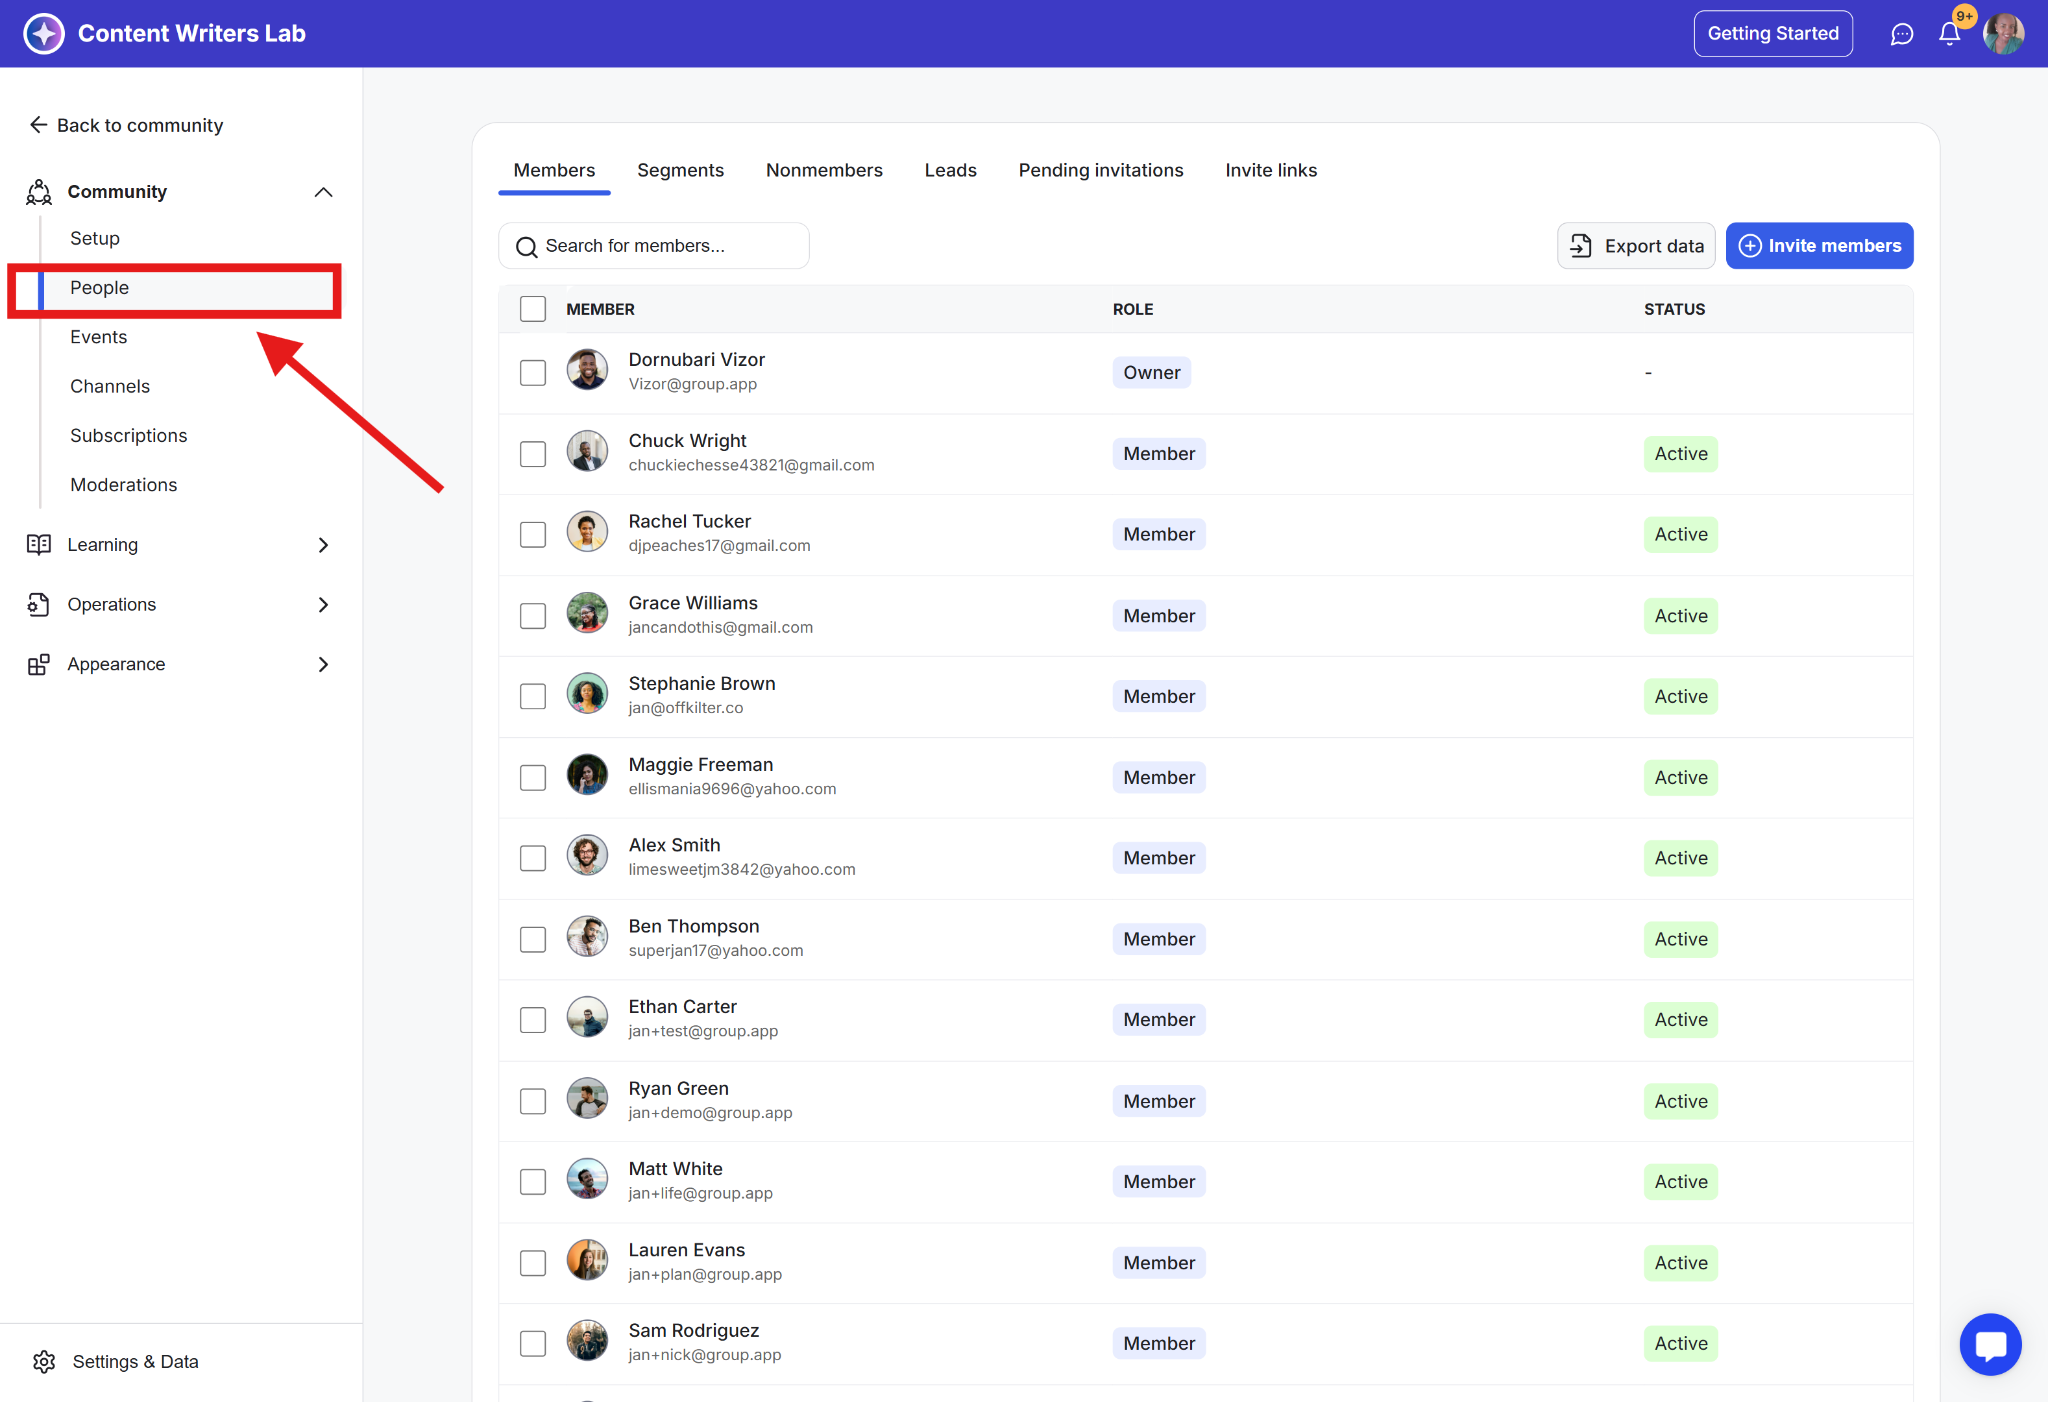
The following tabs are available under the People section:
View all active members in your community along with their profiles, roles, and subscription status. This tab helps you monitor engagement and manage access on an individual or bulk level.
Segments let you group members based on shared traits such as interests, activity, or membership level. They help you personalize access to content and tailor communication across your community.
Learn how to add members to a segment and more.
See users who have interacted with your community but have not completed the sign-up process. This helps you understand interest levels and identify opportunities to convert them into members.
Manage people who have expressed interest in your community but have not joined yet. Use this tab to follow up, nurture relationships, and guide leads toward membership.
Track invitations that have been sent but not yet accepted. You can resend, cancel, or update invites to ensure the right people join with the correct access.
Create and manage invite links that control how people enter your community. These links let you define access, roles, and permissions in advance for smooth onboarding.
Learn more about member management here.
Easily grow your community by inviting your first members using flexible invite options. Whether you are adding one person or a group, you can control access, roles, and permissions for a smooth experience.
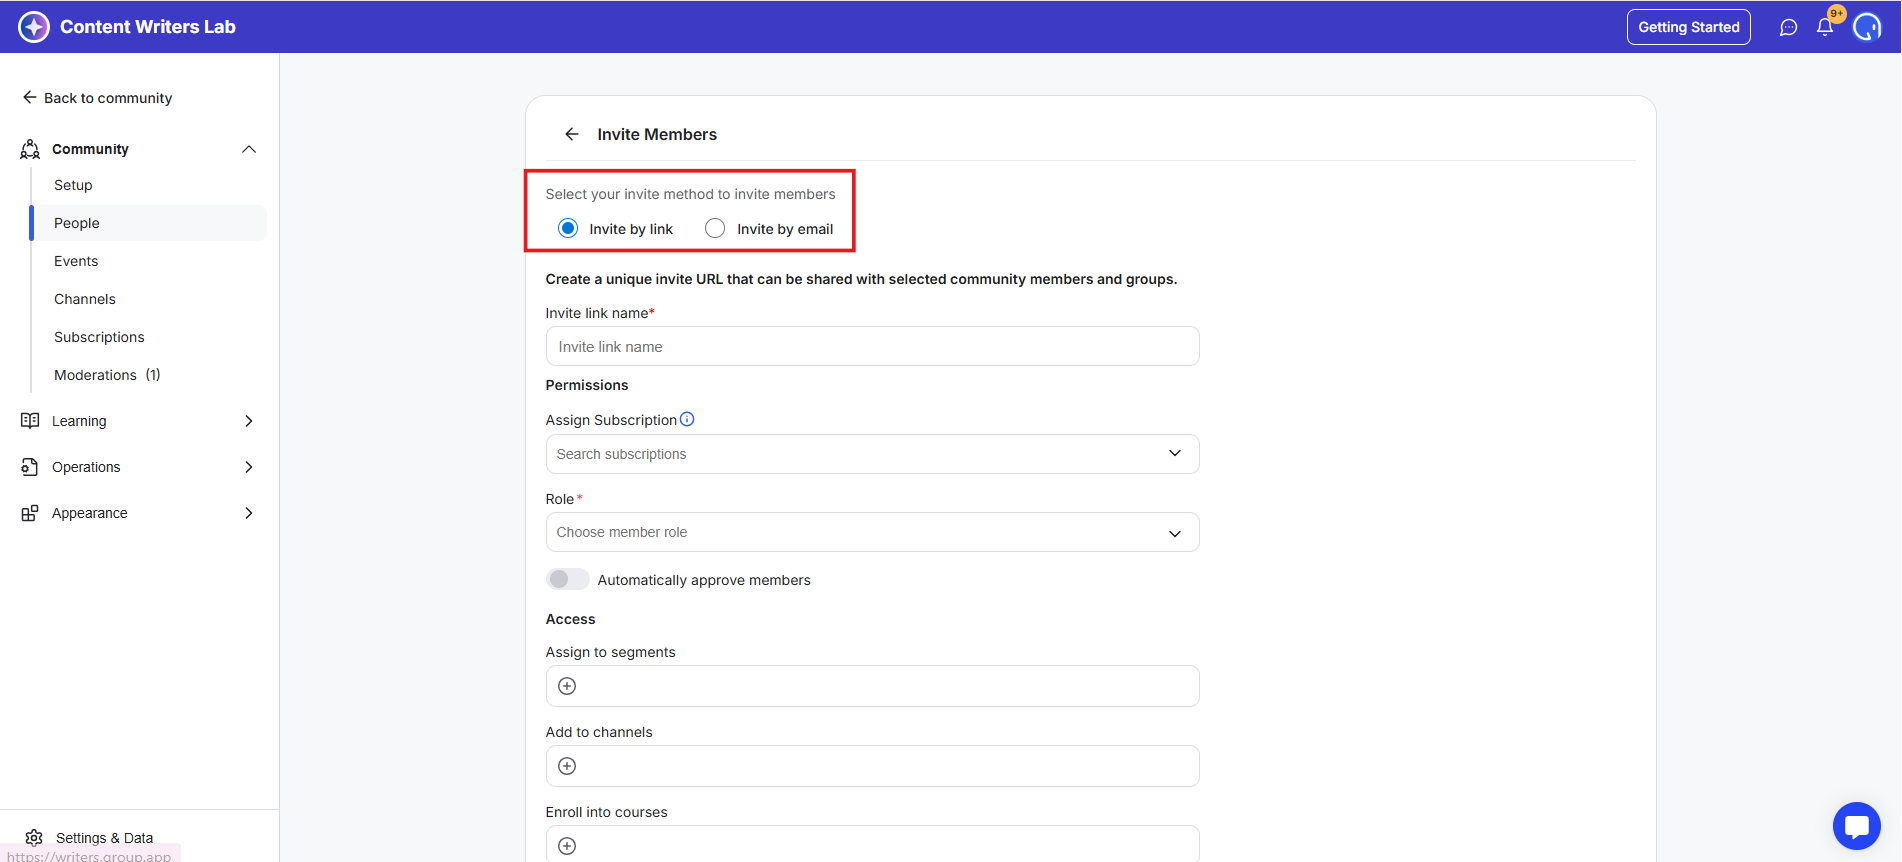
Individual Invite by Email: Best for inviting a small number of members manually. Enter up to 10 emails at a time to send personalized invitations.
Invite by Link: Create pre-configured, reusable invite links that grant specific access levels to coaching groups, course cohorts, or subscription-based members.
Note: To prevent spam, the Invite by Email options are disabled by default. Please contact Support to have these options enabled for your account.
💡 Tip: Set up invite permissions in advance so new members get the right access from the start. This saves time, simplifies onboarding, and keeps your community organized.
Go to the Admin Panel.
Click on People in the left-side menu.
Click on the Invite Members button.
Choose your preferred invite option and configure it.
Click on Send Invite.
Learn More:
How to invite members through invite links
How to invite members through email
Your community, your rules. The Community Settings panel lets you control key aspects of how your space operates.
Here’s what you can do:
Set Privacy: Choose between an Open or Closed community.
Define Currency & Time Zone: Ensure pricing and events align with your audience.
Customize Navigation: Hide or edit menus for a cleaner experience.
Add Community Links: Make important resources easily accessible.
Manage Notifications: Configure how members receive updates.
Control Sign-Ups: Open or close new member registrations anytime.
Enable or Disable Direct Messaging: Choose if members can message each other.
Fine-tune these settings to shape the experience you want for your community.
GroupApp has even more features to help you grow, engage, and monetize your community.
Beyond the essentials, here’s what you can explore next:
Workflows: Automate repetitive tasks, save time, and focus on community growth.
Landing Page Builder: Create no-code sales pages for your courses, coaching programs, and memberships that convert.
Integrations & Webhooks: Sync your community data with your favorite tools.
Analytics: Track community growth, engagement, content performance, and much more.
Branding: Customize your community’s look and feel.
Certificates: Issue certificates for completed courses and programs.
Moderation: Create a safe space with member roles and post approvals.
Keep building and growing. There’s plenty more to discover inside GroupApp.
Next Steps
If at any point you need help, simply click the blue help icon in the bottom right corner while logged in on the web, and a GroupApp team member will be there to assist you.
Want to figure things out on your own? Dive into our Help Center—it’s packed with articles on everything you need to know.
Your setup is complete. It’s time to grow and engage!
