Your Branded Mobile App is published to Google Play through a Google Play Console developer account that you own. This keeps your app and its developer account under your ownership while allowing the GroupApp team to manage the technical setup and publishing process once you give us access.
Creating a Google Play Console developer account requires a one-time $25 USD registration fee, paid directly to Google.
This guide walks you through the complete account creation process.
Before you start, make sure you have the following:
A Google Account that will own the developer account. We recommend using a business account rather than a personal Google Account because whoever controls this account controls your developer account and app. Turn on 2-Step Verification before you begin.
A credit or debit card to pay the $25 USD registration fee. Google accepts MasterCard, Visa, American Express, Discover in the US, and Visa Electron outside the US. Prepaid cards are not accepted.
If you're creating an Organization account, you'll need your D-U-N-S number, legal business name, business address, phone number, and a working website.
If you're creating a Personal account, you'll need a valid government-issued ID and credit card, both in your legal name, as well as a physical Android device running Android 10 or later.
You must be at least 18 years old.
Note: If you're creating an Organization account and don't have a D-U-N-S number yet, start there first. It is free to obtain but can take up to 30 days.
See How to Set Up Your D-U-N-S Number for Your Branded App.
Tip: If you're signed in to multiple Google Accounts in your browser, use a private or incognito window. This helps make sure you're creating the developer account under the correct Google Account.
Before starting registration, you'll need to choose whether you're creating a Personal or Organization developer account. This is an important decision because the account types have different requirements, and changing the account type later can be difficult.
Personal Account: Your personal identity is associated with the developer account. Personal accounts created after November 13, 2023 must also complete Google's closed testing requirement before publishing publicly. This requires 12 testers to remain opted in continuously for at least 14 days, followed by an application for production access.
Organization Account: Your organization is associated with the developer account, and the closed testing requirement for new Personal accounts does not apply. You'll need a D-U-N-S number to create this type of account.
We strongly recommend creating an Organization account if you're registering on behalf of a business. An Organization account is also required if your app relates to financial services, health, VPN services, or government.
Important: Choose your account type carefully. Google does not support converting an Organization account into a Personal account. Changing from Personal to Organization is possible, but requires creating and verifying a new payments profile of the correct type and linking it to your developer account. Your account type is connected to your Google payments profile and cannot simply be edited on the existing profile.
Go to the Google Play Console signup page here.
Sign in using the Google Account that you want to own the developer account. If needed, create a new Google Account first.
Click Get Started.
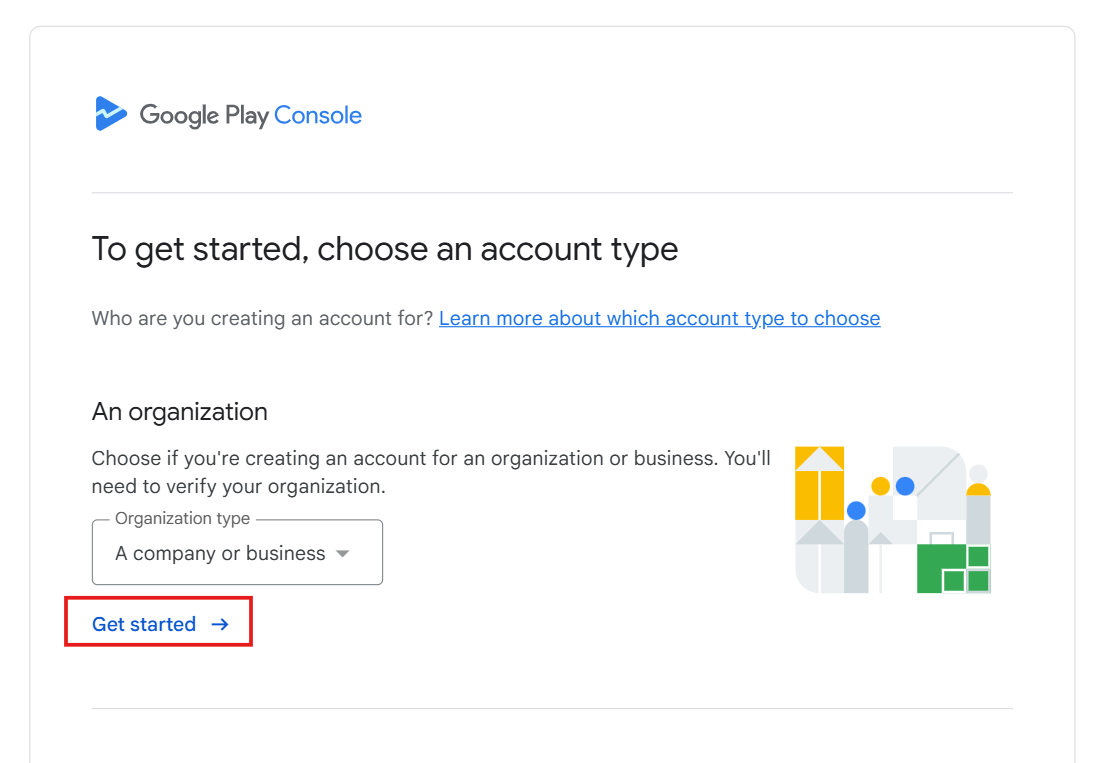
Note: Google may update the Play Console registration process from time to time. The exact order or appearance of the screens may vary slightly, but you should be asked for the same general information covered in this guide.
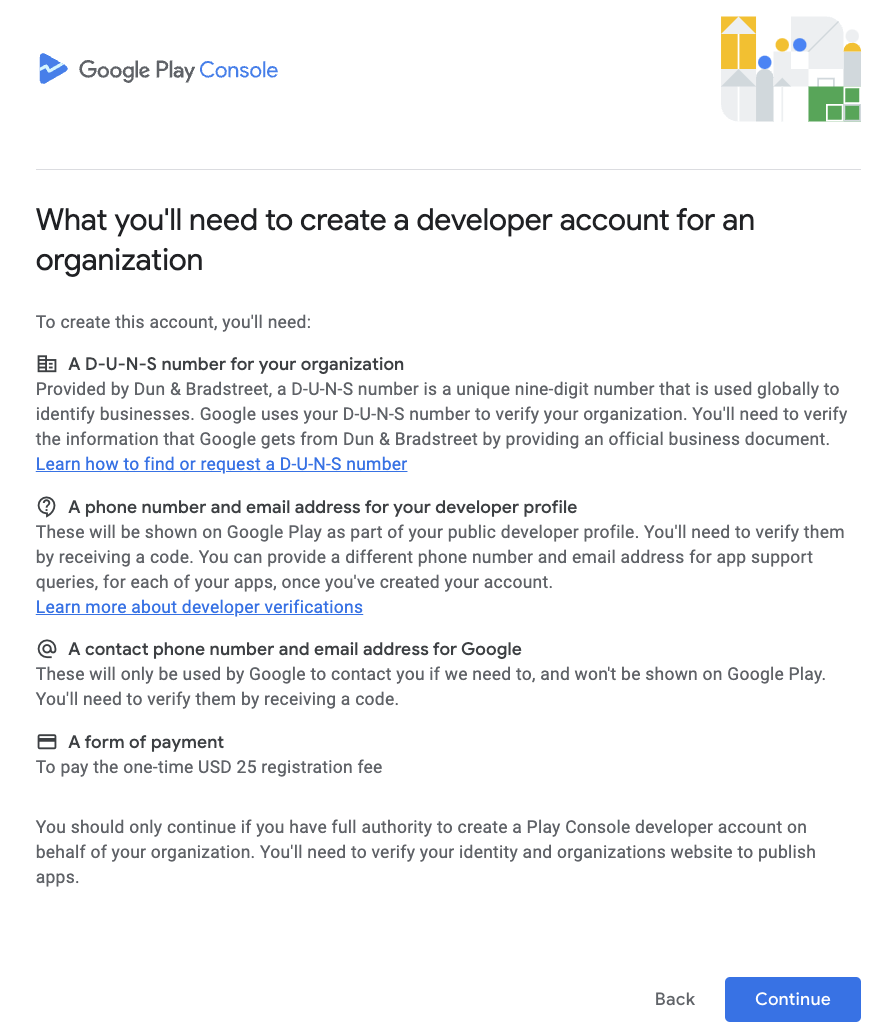
Google will show you an overview of the information required to create your developer account.
Review the information and click Continue. (Check the image below for reference)
Read and accept the Google Play Developer Distribution Agreement to continue.
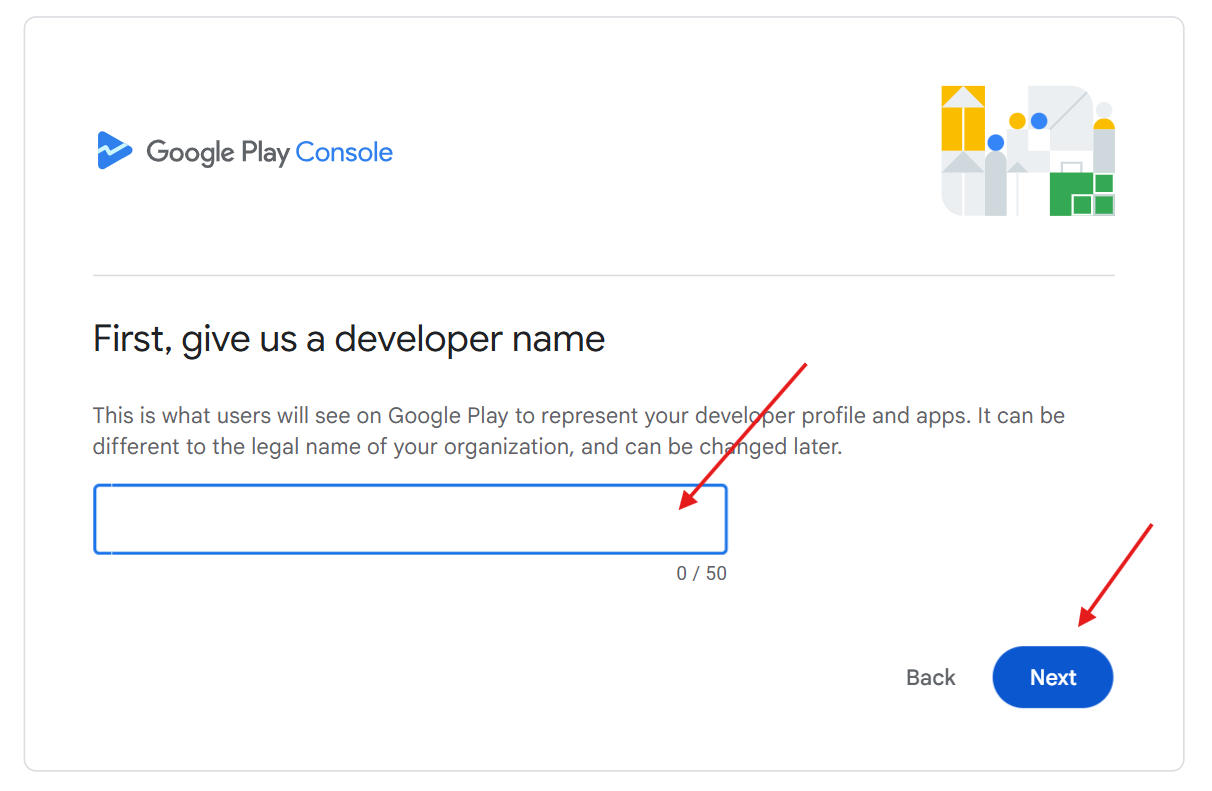
Next, enter the Developer Name you want displayed publicly on Google Play.
Your Developer Name does not have to be the same as your legal business name. We recommend using your brand or business name because this is the name people will see when viewing your app's developer information on Google Play.
Avoid generic names such as "My Business Developer Account" that aren't intended to represent your brand publicly.
Click Next when you're done.
Your Google payments profile contains important legal and billing information associated with your developer account, so make sure you set it up correctly.
1) Click Create or Select Payments Profile.
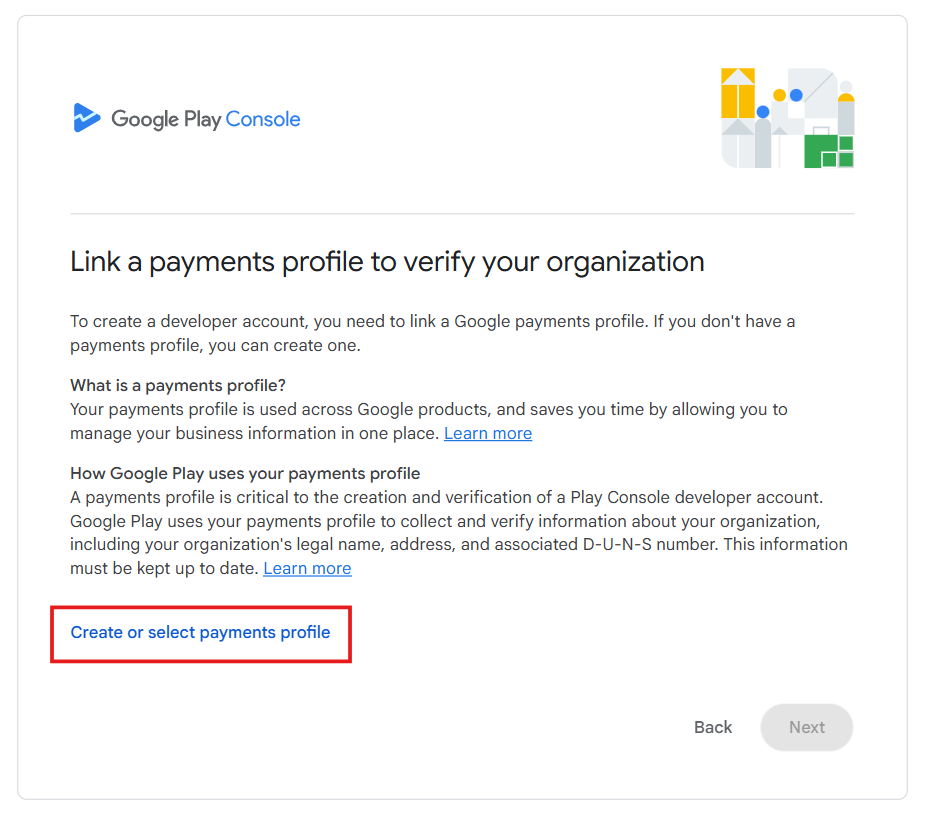
2) If you already have a Google payments profile, you can select it as long as it has the correct account type and information. Otherwise, create a new one.
3) Select the correct profile type. If you're registering your business, choose Organization.
4) Enter your legal name and address. For an Organization account, make sure these details match your Dun & Bradstreet record exactly.
5) Enter your payment information and pay the $25 USD one-time registration fee.
6) Review your information carefully and click Next.
Important: Your payments profile is where important details such as your account type, country, legal name, address, and D-U-N-S information are connected to your developer account. Some of these details cannot simply be changed later on the existing payments profile.
A mismatch between your legal business information and your Dun & Bradstreet record can prevent successful verification, so double-check everything before continuing.
Note: The registration fee is non-refundable if invalid information is submitted.
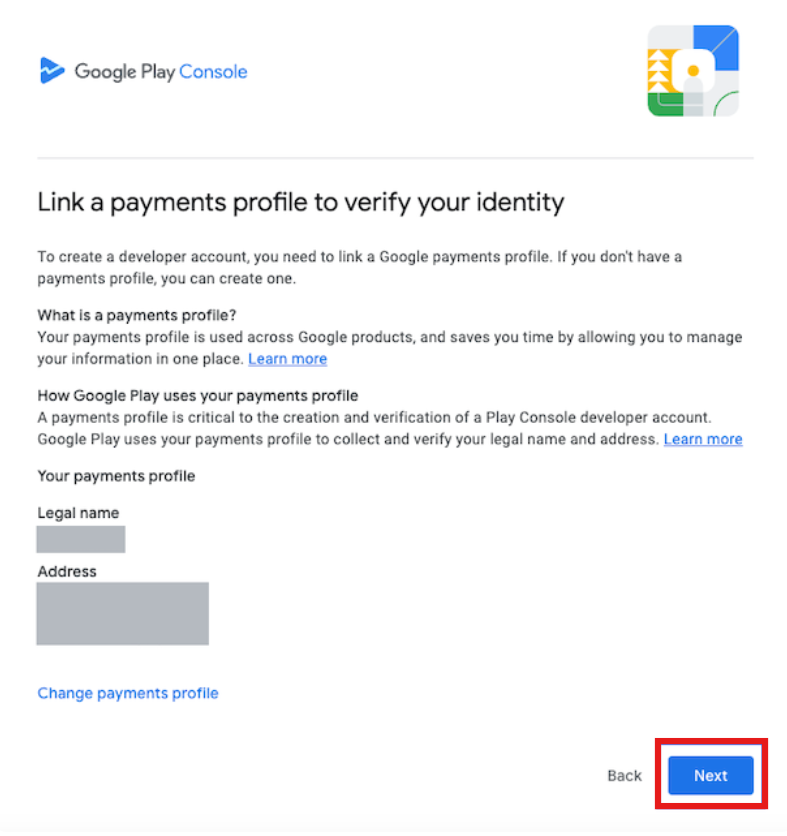
Next, add the contact information associated with your developer profile.
Enter your Developer Email Address. This email can be displayed publicly on your Google Play developer profile, so we recommend using a business email such as [email protected] instead of a personal email address.
Click Verify Email Address.
Enter the six-digit verification code Google sends to your email.
Enter your phone number using the international format, such as +14155551234, and complete the phone verification.
Select the required option consenting to Google displaying the applicable information on your public developer profile.
Click Next.
Please Note: If you're creating an Organization account, Google will also ask for separate contact details, including the name, email address, and phone number Google can use to contact you privately. You'll also need to provide your organization's website.
After creating your account, you'll need to complete Google's developer identity verification before you can publish your app.
Google will require you to confirm your information and submit two verification documents.
The required documents and verification process are covered separately in:
How to Verify Your Google Developer Account
Follow that guide to complete the verification and troubleshoot common document or information-matching issues.
If you created a Personal developer account, Google requires two additional steps before you can publish your app publicly.
You'll need to verify access to a physical Android device.
From your Play Console Home page, open the device verification task and click View Details. Scan the provided QR code using a physical Android phone or tablet running Android 10 or later, sign in to the Play Console app as the developer account owner, and tap Verify.
The device must be a real, non-rooted Android phone or tablet. Emulators cannot be used for this verification.
The process itself typically takes less than a minute.
Personal developer accounts created after November 13, 2023 must complete a closed test before applying for public production access.
You need 12 testers opted in continuously for at least 14 consecutive days.
Testers can include friends, family members, colleagues, or members of your community. If a tester opts out and later opts back in, their continuous testing period resets.
Once you've met Google's testing requirement, the Apply for Production option will become available in your Play Console.
Google is also rolling out a separate Android Developer Verification requirement. This requires developers to verify their identities and register their app package names before their apps can be installed on certified Android devices.
Enforcement begins on September 30, 2026 in Brazil, Indonesia, Singapore, and Thailand, with a broader rollout expected in 2027.
For most developers publishing through Google Play, much of this process is handled through the existing Play Console verification process. Once your Play Console identity verification is complete, Google registers eligible Play apps for you.
Still, check the Home page of your Google Play Console and complete any outstanding developer verification or registration tasks shown there.
Wait up to 48 hours, as the registration may still be processing. If the account still does not appear after that, contact Google through its developer registration support form.
Update your Google payments profile with another supported payment method or check that your billing address is correct. Remember that prepaid cards are not accepted for the registration fee.
If you created a Personal account and need an Organization account, you'll need to create a new payments profile with the correct type, verify it, and link it to your Play Console developer account.
Google does not support changing an Organization account to a Personal account. Doing so requires creating a new developer account, paying another $25 USD registration fee, and transferring your app.
Contact GroupApp before making these changes so we can help you determine the least disruptive option for your Branded Mobile App.
You cannot create an Organization developer account without a D-U-N-S number.
Request one before continuing. It is free but can take up to 30 days to obtain.
See How to Set Up Your D-U-N-S Number for Your Branded App.
Google requires a physical Android device to complete Personal account device verification and does not provide a documented alternative. You can use a borrowed device, and the same physical device can be used to verify more than one developer account.
This additional requirement is another reason we recommend registering as an Organization when you're creating the account for a business.
Once your Google Play Console developer account has been created, there are two important steps left before GroupApp can prepare your app for publishing:
How to Verify Your Google Developer Account: Complete Google's required developer identity verification.
How to Add GroupApp as an Admin to Your Google Play Console: Give the GroupApp team the permissions needed to set up, build, publish, and maintain your Branded Mobile App.
If you need help at any point, contact us at [email protected], and we'll guide you through the process.